Showing posts with label web. Show all posts

Sunday, March 22, 2015

Installing DNN Platform in Azure Website

I was installing DNN Platform on an Azure Website following this documentation on DNN website. But, for whatever reason, my installation never finished and stopped at 18% and gave up. The log button shows nothing. Trying the "Retry" button produces SQL error for basically trying to create existing DB elements.

So I proceeded to delete my website and its DB - and try again from scratch. But after 2-3 times trying and getting the same result over and over again, I started to dig into the internet and found this post - which basically saying:

After installing the website and prior to installing the DNN platform, change the scale from "FREE" to "STANDARD" on your website. Stop & restart - and then proceed to install DNN.
-- read more and comment ...

Tuesday, January 20, 2015

Enabling IIS Express to Accept External Request

I am doing a web development project where the web application needs to look good on all browsers (on Mac and PC - Win7 and Win8) and mobile devices (iPad, Windows Phone, Android, etc). So most of my testing can be done in my development machine - either by running an emulator from Visual Studio, or letting the browser (i.e. Safari) emulate iPad/iPhone resolution. This probably solved 95% of the issues and problems. But, then I still want to do a real device test - where I actually run the web application and browse to it from an iPad, or a Mac, from an Android phone, etc.

Of course - the ideal solution is just to put the web application somewhere on the internet (i.e. http://mytestwebsite.mydomain.com) and let the testing begin. But unfortunately, I do not have the luxury of a QA or test site. So I just have to run it locally.

I can set it up on my IIS, but that seems to be a hassle - removing/stopping my current site running in IIS, setting up this new site, creating all the permissions, app pool, etc. Too much overhead for simple testing. Can I just hit F5, or run the IIS Express and make it accepting external request - so I can hit the site from outside of my dev machine? YES!

Allowing everyone to access http://mydevmachine:80

Open up an admin elevated command prompt and type in this command:
      netsh http add urlacl url=http://mydevmachine:80/ user=everyone

Open up firewall

Now, we need to open up the Windows Firewall for allow traffic to go through. In the same command prompt from above, type in this command:
      netsh firewall add portopening TCP 80 IISExpressWeb enable ALL

Configure IIS Express

Lastly, we need to add our machine name into the IIS Express configuration. You can find the config file located in C:\Users\\Documents\IISExpress\config. Open the file using any text editor and find the web application configuration. My web application is named "Domain.Site.Mvc" in this example.
<site name="Domain.Site.Mvc" id="4">
    <application path="/" applicationPool="Clr4IntegratedAppPool">
        <virtualDirectory path="/" physicalPath="c:\Projects\Domain.Site\Domain.Site.Mvc" />
    </application>
    <bindings>
        <binding protocol="http" bindingInformation="*:12555:localhost" />
        <binding protocol="http" bindingInformation="*:80:mydevmachine" />
    </bindings>
</site>

Now, I can start my site on my dev machine and then browse to it from separate machines, Mac machine, phone, tablets, etc by just going to http://mydevmachine/. With the exception of an iPad. For whatever reason, iPad does not allow browsing to a local machine name - it has to be a fully qualified domain name. I will write a solution to this on a separate blog post.
-- read more and comment ...

Tuesday, October 29, 2013

Custom Textbox Editor Template

ASP.NET MVC's built-in editor template is awesome - by just decorating your model, the Html helper EditorFor knows how to read those attributes and display appropriate html elements and html attributes, including validation, display name, or even using custom templates that we specify through DataType or UIHint attributes.

Now, all my string properties in my models have string length attribute, to prevent truncation when they being saved in the database, or for formatting reason. Now the built-in Html helper EditorFor is not smart enough to translate that StringLength attribute to the actual html attribute of maxlength. Secondly, it is also not smart enough to adjust the width of the textbox based on that StringLength - so a ZipCode property which only need 5 characters should have smaller textbox compared to a CompanyName property which needs 50 characters.

So I made an editor template that do just that. You can copy the code below, put it in a partial view called "string.cshtml" placed within "EditorTemplates" folder under "/Views/Shared/". I use Twitter Bootstrap css to adjust my textbox width (using "input-mini", "input-large" classes) - feel free to substitute them with whatever you are using.
@model String
@using System.Globalization
@using System.Linq
@{
    IEnumerable validators = ModelValidatorProviders.Providers.GetValidators(ViewData.ModelMetadata, ViewContext);
    ModelClientValidationRule stringLengthRule = validators
        .SelectMany(v => v.GetClientValidationRules())
        .FirstOrDefault(m => m.ValidationType == "length");
    if (stringLengthRule != null && stringLengthRule.ValidationParameters.ContainsKey("max"))
    {
        int maxLength = int.Parse(stringLengthRule.ValidationParameters["max"].ToString());
        string inputSize = "input-xxlarge";
        if (maxLength < 5)
        {
            inputSize = "input-mini";
        }
        else if (maxLength < 10)
        {
            inputSize = "input-small";
        }
        else if (maxLength < 30)
        {
            inputSize = "input-medium";
        }
        else if (maxLength < 75)
        {
            inputSize = "input-large";
        }
        else if (maxLength < 150)
        {
            inputSize = "input-xlarge";
        }
        Dictionary attributes = new Dictionary { 
            { "class", inputSize }, 
            { "maxlength", maxLength.ToString(CultureInfo.InvariantCulture) } 
        };
        @Html.TextBox("", Model, attributes)
    }
    else
    {
        Dictionary attributes = new Dictionary { 
            { "class", "input-medium" } 
        };
        @Html.TextBox("", Model, attributes)
    }
}

-- read more and comment ...

Sunday, March 17, 2013

Custom Validation Attribute - Client Side Enabled With Custom Rule

In the previous post, I went over on how to enable client-side validation for our custom validation attribute - using a pre-build jQuery validator. Now what if you want to create your own custom script - because your validator needs to do something truly custom that the pre-build validator is not covering? No problem!

Modify your code to this:
[AttributeUsage(AttributeTargets.Property | AttributeTargets.Field, AllowMultiple = false)]
sealed public class MagicNumberAttribute : ValidationAttribute, IClientValidatable {
   // constructor to accept the comparison property name
   public MagicNumberAttribute(string thirtySevenProperty) : base() {
      if (thirtySevenProperty == null) {
         throw new ArgumentNullException("thirtySevenProperty");
      }
      ThirtySevenProperty= thirtySevenProperty;
   }

   // property to store the comparison field name
   public string ThirtySevenProperty{ get; private set; }

   protected override ValidationResult IsValid(object value, ValidationContext validationContext) {
      // get property info of the "ThirtySevenProperty"
      PropertyInfo thirtySevenPropertyInfo = validationContext.ObjectType.GetProperty(ThirtySevenProperty);

      // check if that property exists / valid
      if (thirtySevenPropertyInfo == null) {
         return new ValidationResult(
            String.Format(CultureInfo.CurrentCulture, "UNKNOWN PROPERTY", ThirtySevenProperty));
      }

      // get the value of the property
      object thirtySevenPropertyValue = thirtySevenPropertyInfo.GetValue(validationContext.ObjectInstance, null);

      // do comparison and return validation result with error if not equal
      if (!Equals(value, thirtySevenPropertyValue)) {
         return new ValidationResult(FormatErrorMessage(validationContext.DisplayName));
      }

      // return null if everything is ok
      return null;
   }

   public IEnumerable<ModelClientValidationRule> GetClientValidationRules(
      ModelMetadata metadata, ControllerContext context) {
      var rule = new ModelClientValidationRule
      {
          ErrorMessage = this.ErrorMessage,
          ValidationType = "magicnumber",
      };
      rule.ValidationParameters.Add("other", OtherProperty);
      yield return rule;
   }
}
As we see, in "GetClientValidationRules", I am returning a "ModelClientValidationRule" with "ValidationType" set to "magicnumber". This string is the javascript method name. The name itself is not important, but they need to be consistent between what you put here and the actual method name in the javascript method itself. I am also adding parameters into it - which then will be transformed into a name-value pair that can be retrieved in our javascript method.

Now create a javascript file to be included in your project (it must be referenced AFTER the basic jquery.js and jquery.validate.js and jquery.validaten.unobstrusive.js).
   jQuery.validator.unobtrusive.adapters.addSingleVal("magicnumber", "other");

   jQuery.validator.addMethod("magicnumber", function (val, element, other) {
      var modelPrefix = element.name.substr(0, element.name.lastIndexOf(".") + 1)
      var otherVal = $("[name=" + modelPrefix + other + "]").val();
      if (val && otherVal) {
        return val == otherVal;
      }
      return true;
   );
The first line is to connect our javascript method "magicnumber" into the validation event and the rest is our client-side script to do client side validation. Our "magicnumber" method takes in "other" parameter, which will hold the value for the name for our comparison property/field - we need that to get the value of the field. We also want to consider if our model is using prefix - beyond that it is just doing a dom selector and get the value and returning a comparison result.

Additional reading:
-- read more and comment ...

Sunday, April 8, 2012

Boost Performance Using Caching

Caching is widely used for static files (like javascript files, css, etc). All browser support client-side caching for these static files. IIS also supports server-side caching. Caching done right can tremendously improve web application serving performance exponentially.

Let's consider this scenario. You have a static html page - let's say this page: http://www.google.com/intl/en/about/index.html. The payload of this page is about 9k bytes. Although it is very small, but payload is still payload. If nothing is cache, every time we go to that page, our browser have to download 9k bytes of data. Now we turn on browser caching, the first time we go to that page, we will download the full 9k bytes of data. But the subsequent visit to that page will load from browser cache. Look at the comparison of network traffic below (the top is the first visit and the below image is the subsequent visit):


The http status code "200" means successful retrieval from the web server and "304" means that content has not been modified therefore doing retrieval from local browser cache. As we see, the data transmitted through the internet or network was 40 times smaller (218B vs 9.5KB) and the time taken is also 5 times faster (47ms vs 203ms) on the subsequent visit. This performance boost is caused by browser caching. Now imagine if we do this to a more complicated page, with all the css files, javascript files, and more images - the performance gain can be quite significant.

There is also a different type of caching called data caching (which I used in application in this blog post about Session variable performance) - which basically means that the application is storing the data retrieved temporarily in memory instead of doing a data retrieval from the database. The benefit of this type of caching is that retrieval from memory is much faster compared to database query/retrieval.

In this post, I will focus on the browser caching and write about data caching in the future post.

Browser caching is actually pretty easy. In short, you need add an "expire" header. The header makes these parts of the website to be cacheable in the client browsers. I usually set an expiration for 30 days after the components were first cache. This means that the first time that component is downloaded into the client browser, it will store itself in the browser cache and reuse it again and again when needed until 30 days have elapsed. On the 31st day, it will discard the cached version and retrieve a new one from the server.

In .NET development, you can set this expiration in a couple ways - by code or via IIS. Both of these approaches will actually do the same thing in the end, so it does not really matter that much, but it's good to know.

If you want to do this by code, put a web.config file in the folder of static files you want to cache. For example, if you have an "images" folder, or "scripts" folder - put this web.config file in that folder. In the screen shot, I have a "Contents" folder, where all my images and css files. Then inside the web.config file, I set the clientCache element with my expiration values.
<?xml version="1.0" encoding="UTF-8"?>
<configuration>
    <system.webServer>
        <staticContent>
            <clientCache 
                cacheControlMode="UseMaxAge" 
                cacheControlMaxAge="30.00:00:00" />
        </staticContent>
    </system.webServer>
</configuration>

If you want to it via IIS, open the website folder that you want to apply and click or highlight the folder of the files that you want to be cached. I am using the same folder as above - the "contents" folder.

Then open/double-click the "HTTP Response Header" feature.

Then click "Set Common Headers..." on the right pane.

This will launch "Set Common HTTP Response Headers" window and you can set the expiration values within this window. Once you hit "OK", what IIS will do is create a web.config file for you - creating the a similar result as the code/manual approach above.

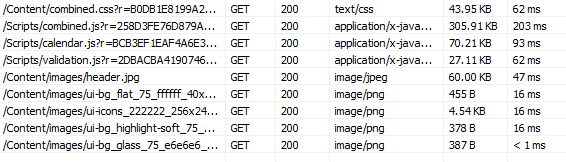
So how is the result - at least for my web application? Here is a screen shot of the payload and timing before caching, or this is the initial load before browser caching takes effect. Totaling 523KB of data for just scripts and image files, taking around 515 ms.
Now, here is the result on the subsequent request, with the caching applied. Totaling 1.8KB of data, taking around 37ms.
So in the end, the payload is 20X smaller and the time is about 14X faster. Quite a big pay off for a small change. Half a second may not seem much, but it does bring a lot of user satisfaction when their experience in using your web application is seamless and without delay. Jeff Atwood wrote excellently in his blog post: Performance is a Feature.

Additional readings:
-- read more and comment ...

Monday, March 19, 2012

Session Variable & Performance

When I was trying to boost the performance of our web application, I typically try to focus on the "bottlenecks" and most of the time these are apparent, especially when using profiler tools (EQATEC, MvcMiniProfiler, etc). But one performance bottleneck really stumped me because none of the tools I use are really showing where the problem is.

The setup is like this: the aspx page loads the main page and javascript - which then makes 2 AJAX calls (using jQuery $.get) to some controller actions which both return ascx view which then injected into the aspx. So basically when the site loads, it hits /Home/Index and then within Index (aspx) view, there are several lines of jQuery that make ajax calls (to /Home/PartOne and /Home/PartTwo to populate parts of the page.

Below is a screen shot from MvcMiniProfiler - which shows a different controller name and action from the generic example above, but with a similar problem:


This measurement shows that there is a 510ms delay/bottleneck happening even before the starting of the execution of my controller's action. For the sake of simplicity in investigating this, the action of the controller actually only returns a list of predefined integers. So in theory, this should be fast - like less than 10ms fast, not 510ms.

Here is a screen shot from PageSpeed that shows where the javascript makes 2 consecutive AJAX calls and although both of these return the same list of integer, one is taking 500ms longer:

When I experimentally put "OutputCache" attribute on "PartTwo", it behaves as expected, that it was executing fast. This hints that the problem is not in IIS, but somewhere after that and before it hits my action method.

Here is the code for my controller - which is bare-bone basic and you should not expect problems with it:
public class HomeController : Controller {
    public ActionResult Index() {
        return View();
    }

    public ActionResult PartOne() {
        List<int> list = new List<int>() { 1, 2, 3, 4, 5 };
        Session["mylist"] = list;
        return View(list);
    }

    public ActionResult PartTwo() {
        List<int> list = Session["mylist"] as List<int>;
        return View(list);
    }
}

Here is my javascript code to load the parts:
$(document).ready(function () {
    $.ajax({
        url: "/Home/PartOne",
        cache: false,
        success: function (data, textStatus, request) {
            $("#TestContainerOne").html(data);
        }
    });

    $.ajax({
        url: "/Home/PartTwo",
        cache: false,
        success: function (data, textStatus, request) {
            $("#TestContainerTwo").html(data);
        }
    });
});

My views - index.aspx:
<h2>Home page</h2>
<div id="TestContainerOne"></div>
<div id="TestContainerTwo"></div>

PartOne.ascx:
<h2>Part One</h2></pre>
PartTwo.ascx:
<h2>Part Two</h2></pre>

So everything looks simple and harmless enough - so WHAT IS THE PROBLEM?

The issue is how Session variable is being processed and handled. I posted this problem in StackOverflow and several users suggested to decorate the controller with
[SessionState(System.Web.SessionState.SessionStateBehavior.ReadOnly)]
... and it worked like a charm.

I did some more tests and investigation about this issue - like when I remove the usage of Session variables and substituting using Http Cache etc - and as long as there is no reference to Session, everything works fast. Since part of my application relies on Session, it would be too difficult to pull all reference to Session variables out.

Upon more research, readings, testing, etc - what I found is this: Session is thread safe. What this implies is that concurrent client requests is blocking and has to be dealt with synchronously. The 500ms is the preset locking cycle time for Session. Therefore this is why the first request can execute fast and without delay but the second one has 500ms delay. Putting the decoration above allows the controller to do a read-only, hence allowing concurrency for reading. But once there is any attempt to write into the session, the delay will be back.

So here is what my updated controller code looks like:
[SessionState(System.Web.SessionState.SessionStateBehavior.ReadOnly)]
public class HomeController : Controller {
    public ActionResult Index() {
        return View();
    }

    public ActionResult PartOne() {
        List<int> list = new List<int>() { 1, 2, 3, 4, 5 };
        HttpContext.Cache.Insert("mylist", list, null, DateTime.Now.AddSeconds(10), TimeSpan.Zero);
        return View(list);
    }

    public ActionResult PartTwo() {
        List<int> list = HttpContext.Cache.Get("mylist") as List<int>;
        return View(list);
    }
}

Additional readings:
-- read more and comment ...

Sunday, July 10, 2011

Samsung Galaxy Tab (10.1 Honeycomb) Experience

I got my Galaxy Tab as a gift from attending Google I/O conference back in May 2011. I have been using it pretty much daily, brought it along on a family vacation with my family for a week - and my wife and son also have been using it to check emails, play games, browse around, etc.

When the Tab was given to us by Google, it had Honeycomb 3.0 on it - since then it has been upgraded to Honeycomb 3.1. I won't bother you with detailed specs - you can see it here, but I will write about my personal experience with it from the last 2 months.

-- read more and comment ...

Monday, May 23, 2011

Web Fonts - Why Haven't I Heard About This Before?

Most of the web only uses selective number of fonts, such as: Arial, Verdana, Sans, Times New Romans. But, what if we want to display certain text with certain fonts other than those - to convey some emotion maybe, or to portray certain values, etc? Are we stuck with those selective fonts?

It's true we can make the text to be bold, underlined, italics, etc. But I want to use "waiting for the sunrise" as my font type instead of "Verdana"! This is not easy to achieve because of several reasons:

  1. We are putting stuff on the web, so if the machine where the browser is running has the font that we want, it will display it. What if it doesn't? Then it will revert to the "default" font. 
  2. All machines or computers have those basic selective fonts - that is why people are mostly sticking with them, so they can be sure that whatever they put on the web will be displayed as intended on the browser.
  3. So far people have been working around this by using images - so if I want a menu or a logo with some font type that is not among the standard, I can make it an image using my image editor and include that in my web site as an asset/image file. This then ensures that it will preserve my intended design of the logo or menu or whatever. 
  4. But of course, making everything an image is a pain. It's hard to modify, it is not searchable by default, people cannot select/highlight from it, and it's bandwidth consuming. But we kinda stuck with it. 
Aren't there any other alternatives? 

-- read more and comment ...

Tuesday, April 19, 2011

Client-Side Validation with AJAX/Dynamic Form

One of the thing in my to-do list for MVC is "figure out how to do client-side validation". Isn't that supplied out of the box since like ASP.NET MVC 2? Yes, it is - but it only work out of the box if the form is not dynamically fetched.

In my projects, most of the form is a dynamic form - so user click an icon and then the form (empty or pre-filled) is fetched via AJAX and then displayed (some times in a jQuery dialog). This is a quite common scenario, for example: you are looking at your account profile screen and displayed there is a list of your phone numbers that you have registered. Let's say you then want to edit one of those since you changed your phone number. So you click the edit button/icon next to your phone number on the screen and a dialog box pops with the old phone number, you edit it, click "Save" and the list refreshes with your phone number.

To simply enforcing a "required" field validation in this scenario was quite complicated. Especially when your AJAX submit handler is a custom handler (instead of using the stock ASP.NET MVC AJAX Helper). But now, by adding less than 10 lines of code, add 2 lines of configuration settings in the web.config and including less than 3 javascripts - it is all possible!

-- read more and comment ...

Wednesday, March 2, 2011

Integrating ELMAH into your ASP.NET MVC project

What is ELMAH? ELMAH stands for Error Logging Modules and Handlers. So it does what it says, logging errors. It's a plug-able stand alone module that you can integrate with your project quite easily.

From ELMAH's site:
Once ELMAH has been dropped into a running web application and configured appropriately, you get the following facilities without changing a single line of your code:

  • Logging of nearly all unhandled exceptions.
  • A web page to remotely view the entire log of recoded exceptions.
  • A web page to remotely view the full details of any one logged exception.
  • In many cases, you can review the original yellow screen of death that ASP.NET generated for a given exception, even with customErrors mode turned off.
  • An e-mail notification of each error at the time it occurs.
  • An RSS feed of the last 15 errors from the log. 
Sounds awesome! Hell yes - beats writing your own any day! How do you integrate it with ASP.NET MVC project?

1. Download ELMAH
You can get the compiled assemblies or the source files here: http://code.google.com/p/elmah/

2. Reference ELMAH's assemblies
If you get the compiled assemblies, just make a reference to Elmah.dll. If you get the source, you will need to build it and then reference it (either by project or by binary).

3. Modify web.config
Open your web.config and make these changes:
a. Add this "configSections" within "configuration"
<configSections>
        <sectionGroup name="elmah">
            <section name="security" requirePermission="false" type="Elmah.SecuritySectionHandler, Elmah"/>
            <section name="errorLog" requirePermission="false" type="Elmah.ErrorLogSectionHandler, Elmah"/>
            <section name="errorMail" requirePermission="false" type="Elmah.ErrorMailSectionHandler, Elmah"/>
            <section name="errorFilter" requirePermission="false" type="Elmah.ErrorFilterSectionHandler, Elmah"/>
        </sectionGroup>
    </configSections>
b. Add this "elmah" section within "configuration" under the "configSections". This will enable ELMAH to save the error log to the database using "MyAppConnectionString" connection string. If you want to save the log into XML files on a local disk, you can uncomment the second line (and comment the 4th line) and specify the saving location under "logPath".
<elmah>
        <!--<errorLog type="Elmah.XmlFileErrorLog, Elmah" logPath="~/App_Data"/>-->
        <security allowRemoteAccess="1"/>
        <errorLog type="Elmah.SqlErrorLog, Elmah" connectionStringName="MyAppConnectionString"/>
    </elmah>
c. Within "system.web" section, add these lines:
<httpHandlers>
            <add verb="POST,GET,HEAD" path="elmah.axd" type="Elmah.ErrorLogPageFactory, Elmah"/>
        </httpHandlers>
        <httpModules>
            <add name="ErrorLog" type="Elmah.ErrorLogModule, Elmah"/>
        </httpModules>
d. Within "configuration", configure the permission to see the log. Basically it will deny all users unless users are logged in and user name is listed in the "allow" list. Enable that by adding these lines:
<location path="elmah.axd">
        <system.web>
            <authorization>
                <allow users="admin,joe,bob"/>
                <deny users="*"/>
            </authorization>
        </system.web>
    </location>

4. Modify global.asax
Check in your global.asax whether this line exists:
routes.IgnoreRoute("{resource}.axd/{*pathInfo}");
If it is, then no more changes are needed in the global.asax.

5. Preparing Database
If you elect to store the log in the database, then some tables and stored procedures must be created before ELMAH can be functional. Get the script to create all those tables & stored procedures here: http://code.google.com/p/elmah/wiki/Downloads?tm=2 and run it.

That should be it and ELMAH is ready to run - you can start accessing ELMAH under /elmah.axd from your root url.

But I went a step further - I want all exception, including handled one to also be captured in ELMAH. ASP.NET MVC provides an filter-attribute called "HandleError" to handle/catch all errors/exceptions happening in the controller or bubble all the way to the controller. So instead of using that, I made my own HandleError attribute that will log to ELMAH - and replace the stock [HandleError] with my [ELMAHHandleError] attribute.

6. Create [ELMAHHandleError] for all my controllers.
I took this code from NerdDinner example that ASP.NET team provides in CodePlex.
public class ELMAHHandleErrorAttribute : HandleErrorAttribute {
        public override void OnException(ExceptionContext context) {
            base.OnException(context);

            var e = context.Exception;
            if (!context.ExceptionHandled   // if unhandled, will be logged anyhow
                    || RaiseErrorSignal(e)      // prefer signaling, if possible
                    || IsFiltered(context))     // filtered?
                return;

            LogException(e);
        }

        private static bool RaiseErrorSignal(Exception e) {
            var context = HttpContext.Current;
            if (context == null)
                return false;
            var signal = ErrorSignal.FromContext(context);
            if (signal == null)
                return false;
            signal.Raise(e, context);
            return true;
        }

        private static bool IsFiltered(ExceptionContext context) {
            var config = context.HttpContext.GetSection("elmah/errorFilter") as ErrorFilterConfiguration;

            if (config == null) return false;

            var testContext = new ErrorFilterModule.AssertionHelperContext(context.Exception, HttpContext.Current);

            return config.Assertion.Test(testContext);
        }

        private static void LogException(Exception e) {
            var context = HttpContext.Current;
            ErrorLog.GetDefault(context).Log(new Error(e, context));
        }
    }

That's it!

For further reading:

-- read more and comment ...

Tuesday, September 14, 2010

Session Timeout Settings in IIS7

We did a release to a production environment running IIS7.x, .NET 4, MVC2, etc. Everything went smoothly and after several hours, we started to get calls about time-out issue. Our users want the time-out to be 1 hour (the current setting) which is obviously longer than 20 minutes (which is the default setting).

I remember changing and rechecking this parameter value in the web.config and also in the IIS box, both in our test and production environments. So we double checked and everything was setup correctly - so we did our own test. After 10 minutes, no time out - as expected. But on the 20-25 minutes test, we did get a time out. We triple-check our web.config and application pool setting - they are all setup correctly.

So, apparently, I missed one other time out setup in IIS - the cookie time out. Basically there are 3 (or 4 depending on your authentication setup) settings that need to be managed. IIS will use the lowest value. The main 3-4 settings that I have to change are:
  1. Application Pool - - Advanced Settings Menu - Process Model - Idle Time-out (minutes)
  2. Sites - - Session State - Cookie Settings - Time-out (in minutes)
  3. If you are using State Server or SQL Server to manage your session (instead of InProcess), you will need to set these values up too: Sites - - Session State - Session State Mode Settings
  4. Under web.config - system.web - authentication mode - forms - timeout (for form authentication)
-- read more and comment ...

Sunday, June 13, 2010

Using T4MVC in ASP.NET MVC2

For the last 2 months, I have been using T4MVC for my MVC2 projects - and it is awesome! Previously, to provide strongly typed view name/path, I have to create a helper class that list all of my view names and location, so when I refer to them I can just type:

<% Html.RenderPartial(ViewLocations.MyCustomview);%>
This is handy, but every time I create new view or rename it, I have to be diligent in renaming it in my helper class. With T4MVC, all this are done automatically!

You can get T4MVC template via MVC Contrib project in Codeplex. How to use it - after the jump.

To use it, you will need to follow these easy steps:

  1. Download T4MVC (consisting of 2 files: T4MVC.tt and T4MVC.settings.t4)
  2. Put the files at the root of your ASP.NET MVC project
  3. That's it basically. If you need to regenerate code, right click on the T4MVC.tt file and click "Run Custom Code"
Here are some of the benefits of using T4MVC template that I heavily depending upon now. For more examples, click here for T4MVC docs on Codeplex.

View Name Constants
Instead of writing this:
 <% Html.RenderPartial("~/Views/MyController/MyCustomView.ascx");%>
I can now write:
 
<% Html.RenderPartial(MVC.MyController.Views.MyCustomView);%>
  
It even works if you have deeper folder structure, so instead of:
  
<% Html.RenderPartial("~/Views/MyController/Controls/MyCustomView.ascx);%>
  
Now I can do this:
 
<% Html.RenderPartial(MVC.MyController.Views.Controls.MyCustomView);%>
  
Also wonderfully works with Area:
 
<% Html.RenderPartial(MVC.MyArea.MyController.Views.Controls.MyCustomView);%>
  
This obviously also works from inside the controller,so instead of:
return View("~/Area/MyArea/Views/Controls/MyCustomView.ascx");
Now:
return View(MVC.MyArea.MyController.Views.Controls.MyCustomView);


Controller Actions
Previously in MVC you have write something like these:
<% =Html.ActionLink("Click here", "MyAction", "MyController")%>

<% =Html.ActionLink("Next Page", "GoToPage", "MyController", new { id = 1, page = 2, active = true })%>

Now with T4MVC magic, they become:
<% =Html.ActionLink("Click here", MVC.MyController.MyAction())%>

<% =Html.ActionLink("Next Page", MVC.MyController.GoToPage(1, 2, active))%>

Or if you have to add additional parameters that are not in the signature of the action:
<% =Html.ActionLink("Click here", MVC.MyController.MyAction().AddRoutevalue("param1", "John"))%>

<% =Html.ActionLink("Next Page", MVC.MyController.GoToPage(1, 2, active).AddRouteValues(new { sortField = "Name", sortDirection = "asc" }))%>


Using it in BeginForm
<%
using (Html.BeginForm(MVC.MyController.Edit(Model.Id), FormMethod.Post)) {
...
}

%>
There are much more usage of T4MVC that will make your MVC coding much more easier. What I have shown you are just the stuff I used the most. I recommend you to check out the docs in Codeplex for more examples.
-- read more and comment ...

Wednesday, June 9, 2010

jQuery 1.4.x Ajax traditional option

I have a very simple jQuery code that basically sends an array of integer back to my ASP.NET MVC Controller class.

 
$.post ("/MyController/MyAction", { myArray: ids });
My controller action:
 
public void MyAction (int[] myArray) {
   // do stuff here ...
}
But upon upgrading to jQuery 1.4.x, it does not work anymore. The param "myArray" in MyAction is always null.

During debugging, I found out that somehow it sent the post data as "myArray[]" instead of "myArray". Of course, you cannot name a parameter name with brackets in C# so simply renaming the parameter name in MyAction won't work.

After some readings, it turns out that this is a change in the jQuery 1.4 release - it changes the way it does param serialization. But, jQuery also provides a new flag in $.ajax to override the default behavior (and go back to use the old way of param serialization): the "traditional" option in $.ajax. So here is my revised code:
 
$.ajax({
   type: 'POST',
   url: "/MyController/MyAction",
   data: { myArray: ids },
   traditional: true
});
You can read more about the new param serialization here and here (under "Nested param serialization" section).
-- read more and comment ...

ASP.NET MVC2 Editor Template for DateTime with jQuery datepicker

Equipping a textbox with datepicker using jQuery is super easy. Once all the jQuery javascript files are referenced, all you need to do is this:

 
$(document).ready(function () {
    $("#myTextbox").datepicker({
        showOn: 'focus',
        changeMonth: true,
        changeYear: true
    });
});
So now, with EditorTemplate in ASP.NET MVC2, this gets easier. So basically I can override the default EditorTemplate for System.DateTime class (which just returns a regular text-box). Once the EditorTemplate is overridden, every time there is a DateTime in edit mode, it will be displayed using my template - which display a smaller text-box and pops up a datepicker once is focus.

Here is my EditorTemplate, located at /Views/Shared/EditorTemplates/DateTime.ascx:
 
<%@ Control Language="C#" Inherits="System.Web.Mvc.ViewUserControl<System.DateTime?>" %>
<%=Html.TextBox("", (Model.HasValue ? Model.Value.ToString("MM/dd/yyyy") : DateTime.Today.ToShortDateString()), new { @class = "UseDatePicker date-text-box" })%>
Now, to declare the datepicker binding once and for all, I moved it to my master page - and instead of using the "id" of the element, use the class as the selector:
 
$(document).ready(function () {
    $(".UseDatePicker").live('click', function () {
        $(this).datepicker('destroy').datepicker({
            showOn: 'focus',
            changeMonth: true,
            changeYear: true
        }).focus();
    });
});
Now adjust the CSS for width of the text-box and other styles:
 
.date-text-box { width: 6em; }
UPDATE: Get the fully working sample project here.

Additional readings:
-- read more and comment ...

Monday, June 7, 2010

VS 2010 Coded UI Test

Last year, ASP.NET Test team release ASP.NET Lightweight Automation Framework and I blogged about it here. With VS 2010 Ultimate, you now can use "Coded UI Test" - which I think replaces it as a whole. The Coded UI Testing minimizes coding and recorded your actions - while also allowing coding and customization.

So how it works is basically like this:

  1. It records your behaviors (on a browser/WPF/Silverlight etc application) 
  2. Then it tries to guess what you are doing (moving a mouse, hover, waiting, clicking a button, typing text, etc).
  3. Generate code to replicate your behaviors/actions based on its guess. 
  4. You can also create assertions, to check whether certain elements (like texbox) has certain value, some labels display certain text, etc.

I have to say that for my web application that I am working on, it does an excellent job. It does all the low end work of recording my actions - and all I have to do is string them all together into a coherent sequence of actions in my tests.

MSDN has an excellent walk through on how to start one and customizing it to fit your needs and I am not going to repeat it in my post. You can read the MSDN how-to here.

In my experience in using it, it has its quirks:
  1. In some AJAX scenarios it will retain the old value or view of certain actions. So let's say you are looking at a product administration "Detail" screen and you click "Edit" to bring up the editing capability. Upon save, your application then brings you back to the "Detail" screen. In this scenario, sometimes upon "Save", the Coded UI test still holds the old "view" of the "Detail" screen instead of reloading/refreshing with the new "Detail" screen with the new/updated values. As a result, when you have an assertion to check whether certain values are updated, it will fail.
  2. Updating and deleting an assertion test or a recording is quite difficult. You have to manually delete it in code all the way. Updating certain test is also quite difficult if you want to do it manually. So for example if I have a test that checks whether a particular textbox value is "Something" and I want to change it to check for "some things" instead, intuitively I went to look for the line of generated code and change the checking value. But upon running, the code is regenerated and my changes are reverted back to "Something".
  3. The generated code also combine most of the generated code into 1 UI map. Which gets huge once you start building multiple tests. MSDN has a walkthrough on how to build tests using multiple UI mappings, but it is quite a challenge.
Beyond those issues that I have experienced so far, the tool itself is pretty impressive and I like it.

Some more readings and how-tos from MDSN

-- read more and comment ...

Sunday, May 16, 2010

Bundling Javascripts & CSS Files

If you are using jQuery for your site, it is possible that eventually your page header section may look like this:

 
<link href="stylesheets/ui.all.css" rel="stylesheet" type="text/css" />
<link href="stylesheets/admin.css" rel="stylesheet" type="text/css" />
<link href="stylesheets/maincontent.css" rel="stylesheet" type="text/css" />

<script src="scripts/jquery-latest.min.js" type="text/javascript"></script>
<script src="scripts/ui.core.js" type="text/javascript"></script>
<script src="scripts/mycustom.js" type="text/javascript"></script>
Now in those lines of code, there are 6 requests being made separately to the server and this can become a bottle neck for your site performance. Both YSlow and PageSpeed (read here and here) recommend reducing the number of requests being made as a way to create a high performance site.

Easy, right? Just combine the files with a simple text editor - both javascript files and css files are plain text anyway! Yes - you can do that. But this approach will yield a nightmare-ish maintainability and just plain ugly.

Justin Etheredge made a small framework to precisely do this - he called it Bundler.Framework. You can read his latest blog post about it here and download the code here. It is very simple to use and I have had excellent results with it. The framework itself is pretty self-explanatory and Justin's posts highlight on how to use it pretty well.

Through this post, I just want to highlight some of the small things I have to do to eventually get it working (and it has been working awesomely).
  • Add a refence to Bundler.Framework.dll
  • For the code to actually create a single js file (or css), you will need to make sure that your site's compilation is configure to NOT debug. You can do this in web.config, or else your js files will just be listed on one by one instead of being combined:
    <compilation debug="false" targetFramework="4.0">
    
  • Bundler also provide options to compress your css and also to minify your js with different minifiers.
     
    <%
        Response.Write(
            Bundler.Framework.Bundle.Css()
                .Add("~/stylesheets/ui.all.css")
                .Add("~/stylesheets/admin.css")
                .Add("~/stylesheets/maincontent.css")
                .WithCompressor(Bundler.Framework.Css.Compressors.CssCompressors.YuiCompressor)
                .RenderOnlyIfOutputFileMissing()
                .Render("/JJCMS/Content/Stylesheets/combined.css")
        ); 
    %>
    <compilation debug="false" targetFramework="4.0">
    
  • Bundler also provide options to only render combined js or css file if the rendered file is non-existent. You use the "RenderOnlyIfOutputFileMissing" option. See code above for example.

So now, with Bundler, your js and css will be rendered like this:
 
<script type="text/javascript" src="/scripts/combined.js?r=67EFAB2205D48FBBB390A6F11C8A4002E"></script>
<link rel="stylesheet" type="text/css" href="/stylesheets/combined.css?r=A84FC8E0836CD939A781066B0BBDE028" />
-- read more and comment ...

Friday, May 7, 2010

Enabling Expiration/Cache in IIS7

Adding "expiration header" into your static files help the browser to cache those files - therefore reducing the payload in the network in which then increase the performance perceived by user. Both YSlow and PageSpeed highly recommend this approach in their high performance website articles.

You can do this programatically, this post is about enabling this in IIS7 - which is pretty easy.

  1. Open IIS Manager
  2. Navigate using the tree-view on the left pane to the folder where your static files are located. In most cases these are your static html, image, css, and javascript files. For example, I put all my images in 1 folder called "images" - so I highlighted that folder and on the right pane, in the "Feature View", double click on "HTTP Response Header".
  3. Under "Actions" - located top right, click "Set Common Headers"
  4. Check "Expire Web Content" checkbox and specify how long you want the files to be cache. I usually set this to 30 days. Or you set a particular date & time too if you want. Hit "OK". Do the same thing for all the folders whose files you want to cache.
  5. That's it! Now if you browse your site and look using YSlow or Fiddler or PageSpeed, you will see that the files under the folders are cache by the browser and not retrieved from the server every time.
-- read more and comment ...

Sunday, May 2, 2010

How to Turn on IIS7 Compression

One thing you can do to speed up your site is by turning on compression on your web server. This approach is highly recommended by Yahoo in their website performance analysis tool YSLOW as well as Google via PageSpeed.

In essence, compression helps in reducing data payload transmitted between the web server and the client browser. With machines (both the server and client machine) that are relatively powerful nowadays to handle compression easily - this than becomes a very viable and efficient solution to reduce network bottlenecks, thus increasing the perceived response to the browsing experience.

Here is how to do it in IIS7:
  1. Open IIS Manager and In "Features" view, double-click Compression. 
  2. Choose one or both of the following: 

    • Enable dynamic content compression to configure IIS to compress dynamic content. 
    • Enable static content compression to configure IIS to compress static content. 

  3. Open the configuration file at "C:\Windows\System32\inetsrv\config\applicationhost.config" and make sure your compression settings are correct or if you want to add/remove any compression settings.
Mine looks like this:
 
<httpCompression directory="%SystemDrive%\inetpub\temp\IIS Temporary Compressed Files">
    <scheme name="gzip" dll="%Windir%\system32\inetsrv\gzip.dll" />
    <dynamicTypes>
        <add mimeType="text/*" enabled="true" />
        <add mimeType="message/*" enabled="true" />
        <add mimeType="application/x-javascript" enabled="true" />
        <add mimeType="*/*" enabled="false" />
    </dynamicTypes>
    <staticTypes>
        <add mimeType="text/*" enabled="true" />
        <add mimeType="message/*" enabled="true" />
        <add mimeType="application/javascript" enabled="true" />
        <add mimeType="*/*" enabled="false" />
    </staticTypes>
</httpCompression>
That's it! Easy!

Now one caveat is that it seems that IIS7 does not compress javascript file immediately, so it may need a few hits before you can detect it using fiddler or firebug etc. I waited for about 2-3 days before eventually YSLow and PageSpeed both detect that all my javascript files are compressed.
-- read more and comment ...

Monday, March 15, 2010

Browsing securely using an SSH tunnel

Browsing on an internet cafe or a open/free wireless hot spot is scary sometimes. Some places are secured enough (like airport), but some are pretty questionable. You're not sure who owns the router, whether they put security on it, packet tracer, or a phising software etc ... Some times you also want to avoid the proxy that tracks your cookie, traffic, website blocker, etc etc. Regardless of the reasons, you may want to be able to browse securely - and a way to do it is by tunneling it via SSH.

So how does this work? Basically you want to setup an SSH server and redirect all of your browser traffic via this SSH server using an SSH client on your computer (instead of directly via http into the internet). This SSH tunnel is secured, so no one can peek into your traffic, unlike the regular http traffic. So here is how I did mine using Bitvise WinSSHD & Tunnelier. You can download both (free) from Bitvise website.

Installing WinSSHD (the SSH server)

  1. You will need a computer that is always on or with wake-up on LAN enabled. I use my media center machine for this. 
  2. Download WinSSHD (from here) and install it. Just follow the default instruction on the screen and you should be ok. If you are not an administrator on your machine then you will need to install this as an administrator. There is a more detailed User's Guide by Bitvise here.

Configuring WinSSHD

  1. Once installed, the WinSSHD control panel should open with the "Easy WinSSHD Settings" window open.
  2. Under "Server Settings", you can customize the listening ports etc if you want - or just leave then with the default settings and click "Next" and go to "Windows Account".
  3. Under "Windows Account", you can allow or disallow Windows Account to login/connect to your SSH server. The default setting is to allow. I disallow this for security reason and created a locked down virtual users instead. You can read more about virtual vs Windows account here.
  4. Under "Virtual Users", you can add virtual users. Click "Add" and assign account name and customize the permissions for that user, then click "OK". Once the user shows up in the list, select the user row, and click the pencil icon under "Virtual account password" column and the click the "Manage" button, then set the password for that user.
  5. Once the "Easy WinSSHD Settings" window is gone, now you are looking at the WinSSHD control panel.
  6. Now click "Edit advanced settings" and go to "Windows Firewall" area. Make sure that both drop downs are set to "Open ports to any computer" - so you can connect from outside your network/internet. You can read about opening up WinSSHD to the internet here.
  7. Make sure the service is running. If not, start it. There should be a link in the control panel to start or stop the WinSSHD service.

Installing & Configuring Tunnelier

  1. Download Tunnerlier (from here) and install it. Just follow the default instruction on the screen and you should be ok. If you are not an administrator on your machine then you will need to install this as an administrator. There is a more detailed User's Guide by Bitvise here.
  2. Once installed, try connecting to your WinSSHD from within your network by entering the IP/host name, port, username, and password in the login area of Tunnelier and click "Login".
  3. You should see the status of connection and data transmission in the right text area.
  4. Now once it is setup within the network, before you can try it from the outside of your network, you will need to configure port forwarding in your router.

Configuring Router Port Forwarding

  1. A router usually has a port-forwarding tool built-in. I am not sure how each router does their setting specifically, but usually there are several simple steps to register the port-forwarding. Go to portforward.com/ for the specific instructions on how to do it for your router.
  2. Make sure your box that runs the SSH server is running on a static IP address within the local network. You can do this via the router's DHCP or using the TCP/IP setting in your computer.

Registering (dynamic) DNS Name

  1. If you are running your SSH server from home, most likely you have a dynamic IP address. So, what you want to do here is register a dynamic DNS name, so that when your IP change, it is be also updated and tied to your DNS name dynamically. In the end, all you need to remember is your DNS name. The way this works is that dynamic DNS registration company has a small software in your box that will send an updated IP address to your dynamic DNS registry so it continuously updating your DNS name registration with your current IP address.
  2. There are a lot of dynamic DNS provider out there in the internet - make your own pick here. I use No-IP. Usually you just need to register/create an account on their site, pick your DNS name and download the updater client software and install it on your box and you are set!

Trying It From Outside Your Network

  1. To do this obviously you will need to be connecting to the internet from outside your LAN
  2. Open up Tunnelier
  3. Instead of entering the internal IP address, enter the dynamic DNS name you have registered and leave everything else the same and then click "Login"
  4. If the port-forwarding and Windows Firewall and the account settings are set up correctly, you should be connected to your SSH server.

Setting Up Your Web Browser & Tunnelier for Secure Browsing

  1. Open up Tunnelier and go to "Services" tab. Make sure "SOCKS/HTTP Proxy Forwarding" is enabled. Put "127.0.0.1" for "Listen Interface", pick an unused port number (like 8081) enter it in "Listen Port" field, leave the "Server Bind Interface" to be all zeros. Basically, follow these settings in Tunnelier.
  2. Now in your browser, follow these settings: Firefox, Internet Explorer
  3. Now you are set!
-- read more and comment ...

Wednesday, March 10, 2010

AJAX Animation using jQuery

During an AJAX call from a website, usually the screen won't blink - because page is not refreshing. This is neat because it gives the impression to the user that their interaction with the site to be seamless and uninterrupted.

But sometimes, you do want to give a visual clue to the user that an action is happening and you want them to know about it. Maybe by giving them an hourglass or a "loading ..." clue etc. So how do you do this easily? This post is about using jQuery to provide visual clue to the user on AJAX requests.

First, obviously you will need to reference jQuery library. I usually use the one hosted in Google:
 <script src="http://ajax.googleapis.com/ajax/libs/jquery/1.3.2/jquery.min.js" type="text/javascript"></script>
Add the HTML to display our visual clue. In this example I am displaying a black bar on the top of the browser, about 25px in height that has a "Loading ..." text in it. So when an AJAX call is happening, this black bar will be displayed until the call is done.
 <div style="z-index:101; width:100%; height:25px; position:fixed; left:0px; top: 0px;">
<div id="loadingbar" style="height:25px;display:none; margin-left:auto; margin-right:auto; background-color:#000000; color:#fff">
  Loading ...</div>
<div class="stretch"> </div>
</div>
Now we add the javascript to show and hide the bar, plus I also like to gray out the background a little bit.
 $(document).ready(function() {
    jQuery().ajaxStart(function() {
        $("body").fadeTo("fast", 0.70);
        $("#loadingbar").show("fast");
    });
    jQuery().ajaxStop(function() {
        $("body").fadeTo("fast", 1.0);
        $("#loadingbar").hide("fast");
    });
});

Done. Now anytime there is an AJAX call in your page, the background will be grayed out a little bit and a black bar will show up on the top. To increase/decrease the opacity of the background during the graying out, you can adjust the value on the "fadeTo" call. Currently it is set to "0.70" or 70%. If you want less transparency (or more grayed out), then set it lower (between 0.00 to 1.0), and set it higher for less transparency.
-- read more and comment ...