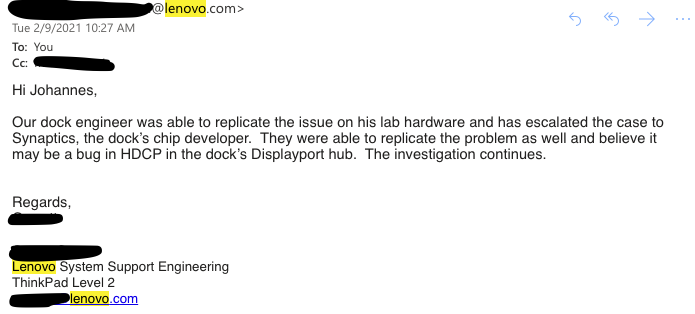
Around fall 2020, my old desktop PC was on its last leg (it was running Intel Core Quad 9300 - so it was super old). I decided to get a reasonable powerful laptop with a dock that can drive two 2K (2560x1440) and one 1920x1200 monitors. So I purchased a X1 Carbon Extreme Gen 2 (running i7-9750H, 32 GB RAM) and Thinkpad Thunderbolt 3 Workstation Dock Gen 2 (40AN) - and I also purchased the Premier Support. But soon, it was apparent to me something was wrong. Lenovo and their team has been very professional in responding to the issue. Every call I made to the Premier Support team or email exchanges have been helful and courteous. They deserve a lot of credit in investigating the issue and trying to find a good resolution with me. In short, to the user (me), the external monitors will blink (goes blank and comes back within a second or less) and some times will go blank for a period of time (ranging from two seconds to several minutes, or in some minor instances actually never come back). After about 8 weeks, Lenovo admitted that there is a bug in their dock - or to be precise in the chip (from Synaptics) they are using in the dock. The bug is related to HDCP - which is digital copy protection to prevent copying of digital audio and video content (i.e. during streaming). Since this chip is being used in all their TB3 docks (and Lenovo said also being used in other brands like DELL and HP docks) and it cannot be fixed via firmware update, so Lenovo said they do not have a workable solution for this issue (for me and other dock owners). I ended up trying to get a refund for my dock.
I always use my laptop with the lid close, connected to the dock with the provided custom cable (which provide TB3 connection and power), with everything else connected to the dock (3 monitors, USBs, network).
The problem starts with intermittent screen flickering - which I initially dismissed as just small annoyance or maybe lose connection/cable. But it got to the point where it was annoying enough for me and I contacted Lenovo Premier Support. I started my case on January 4th and after about 11 weeks - it is now closed (but not resolved).
It also happened with https://eshop.macsales.com:
If you are interested in the chronological timeline of the saga, here it is:
For the video recordings of the issue - they are available here and here.
-- read more and comment ...



Showing posts with label Windows. Show all posts
Showing posts with label Windows. Show all posts
Tuesday, March 23, 2021
Lenovo Thinkpad TB3 Dock Saga
Topics:
dock,
gadgets,
hardware,
Lenovo,
performance,
technology,
thunderbolt,
Windows

Sunday, November 18, 2012
Microsoft Surface

But there is also a need for a mobile device for me - different client assignments, VPN to the office, RDP to my development VMs, creating documents and presentations, etc. I have a smartphone that fulfill most of my email and social networking needs, but my smartphone is far from the quintessential device to create content and be productive (such as creating a Power Point presentation or writing a blog post like this).
Trying to meet the need between the desktop and the smartphone, there are several ideas that come to mind: a huge smartphone (like Galaxy Note), a Chromebook, an ultra-book, or a tablet. But, none of them really fit with my needs or budget - until I heard about Microsoft Surface. I went to the closest store in Cleveland, OH to try and test the Microsoft Surface the day it came out on October 26th 2012. I liked it, bought it, and have been using it pretty much daily ever since.
So why Surface? Why not those other options? Macbook Air? Chromebook? iPad? Galaxy Tab? Nexus 7?
TL;DR
Microsoft Surface is fantastic. It fits my needs awesomely with the correct price point. It provides me the tools to be productive (like creating this lengthy blog post or creating a Power Point presentation) but yet still allows me to have the occasional entertainment and media consumption such as games (WORDAMENT, Angry Birds), movies (XBOX Movies, Hulu), etc. It is not the be-all and end-all laptop or tablet - but it is certainly much more capable than iPad, Chromebook, or any Android tablets I have tried.OFFICE SUITE
I owned a Galaxy Tab and used Nexus 7 quite extensively (before giving it to the office for Android development purpose). While the Tab and the Nexus 7 are nice consumption devices - they are really lacking in productivity tools. Quick Office, Google Docs (and others) are quite nice in their own rights, but they are not Microsoft Office. My experience in using them left me longing for the Office experience.The Surface comes with Office 2013 out of the box. It only has Word, Excel, Power Point, and OneNote. Now these applications are not striped down version of Word or Excel, etc - but they are the full version, just like the regular Office that I have on my desktop. Yes, it does not have Outlook or Access, but the essential four is enough for me. Just by that virtue alone - the Surface has become the best tablet for productivity.
My mobile device does not need to be beefy - but it has to be able to support Office - and Surface does that (and more). This is also one of the reason why Chromebook is not enough - it runs great for most of my need (email, browsing, searches, remote desktop, even Office Web App), but falls short for my power user need for Office.
TOUCH/TYPE COVER
The cover for Surface doubles as a keyboard as well - which is awesome.I have a cover for my Tab, which also functions as a stand. But then if I want to use a keyboard dock, I have to take the Tab out of the cover and dock it. Once done, I have to un-dock it and put it back into its cover. Plus, ever seen a Galaxy Tab keyboard/dock? It's ugly and thick.
The Type Cover is also thin, but thicker than the Touch Cover (6mm). It also can be folded back, magnetically attached, only comes in 1 color: black with gray back. With it I can probably type fairly close to full speed. Both covers are reversible and using very strong magnetic connection - so strong that I can hang my Surface upside down holding the cover without it falling off.
If you hate the small keyboard or the feeling of it - you can still plug in your existing (mechanical) keyboard via USB - and it will always work.
BATTERY LIFE
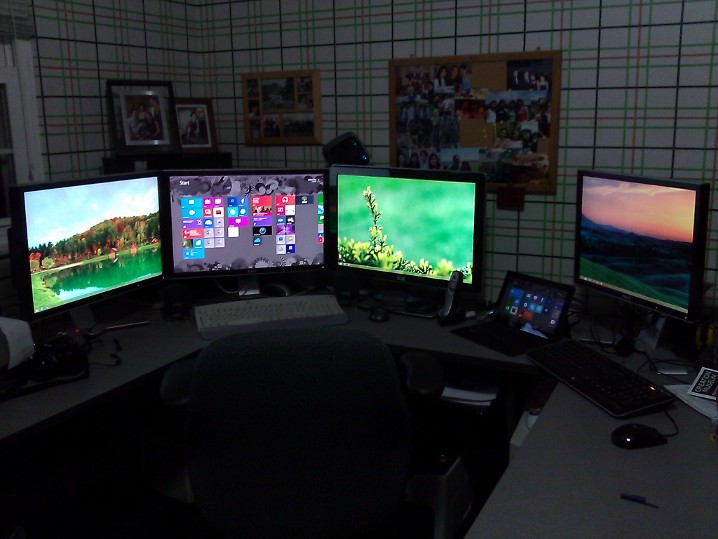
 The battery life for the Surface is great - pretty similar to iPad, about 9 hours plus. So basically it can easily last the whole day. I brought mine to the office last week and used it pretty much from the morning (around 9am) until end of day (around 4:30pm) without connecting it to its charger and with probably 10% left at the end of the day. This was using the Surface connected to an external monitor, with a USB mouse, and used to connect to a VM via remote desktop all day. You can see the setup in the picture on the right.
 This kind of battery life is pretty awesome because that means that I don't have to bring my charger every time. I can feel securely that it won't be running out of juice and it will last the whole day - and eventually connect it to the charger at night.
The charger itself is great and it charges very very quickly. I'd say within a couple of hours or so - from almost empty to fully charged. I was certainly benefited from this when I had to charge my Surface on a rush before a trip. I don't know how many times I wished my phone or Tab or laptop would charge faster during a layover or at a friend's house or on the go.
EXTERNAL CONNECTIONS and KICKSTAND
The Surface also has a micro HDMI out port and a USB port. This means I can connect my monitor if needed (like when I am at the office), connect it to a projector for presentation, connect thousands of peripherals (such as my phone, mice, keyboard, printers, etc). The USB port is really awesome - I don't know how many times I wished there is a USB port for my Tab or Nexus 7 - so I can print or connect a keyboard or even a phone or camera to transfer files.
The Surface also has a micro-SD slot, so you can easily expand your space by just adding a micro-SD card - which is not an option for iPad or my Tab.
The kick-stand is absolutely-without-a-doubt-ultra-useful. In my Tab or my friends' iPad, there are no built-in stand. I thought the iPad cover that folds into a stand was brilliant, but the built-in kick-stand for the Surface is more awesome - especially when it is being used in the productive mode like a laptop.
MULTIPLE USER ACCOUNTS
Unlike a smartphone, where single account suffice, I need a mobile productivity tool that can be used with multiple user accounts. I want my emails to be separated from my wife's, my gamer score to be left alone by my son, and my setup not to be messed with. This feature allows me to customize my user experience according to me needs and my wife to her needs, and still allow a guest account for everybody else.Android supports that with the new 4.2 JellyBean update - but that will never come to my Tab. For iPad - this feature is non-existent.
The fact that I am also a Windows user on my desktop, this also means that my setup roams (using Microsoft Account), my music selection & playlists roam, etc - which is nice indeed.
OTHERS and NEED IMPROVEMENT
There are other things that make the Surface nice, such as the XBOX integration with Smartglass, XBOX music, Netflix, Hulu+, etc. Those are nice - but I'd say that those things are bonuses and not the main reason that attracted me to the Surface.The price point for the Surface is also right on. I think spending $1,000 for a Macbook Air (or more for Pro) for what I need is unnecessary and heedless spending. It is the same price point of an iPad/Galaxy Tab, but double the storage, and much much more productive-capable.
There are several things that Microsoft can still improve. The first one is related to my experience with the Touch Cover - where the seam came lose near the connector within 2 days after purchase. MS Support took care of me (with the help of Mr. Sinofsky via Twitter), but it was still disappointing that a product needs to be replaced that soon.
The magnetic connection to the charger is also not that great. It works awesomely when connected properly, but it is a bit of a pain to get it connected and won't snap with assurance (unlike the Covers) without really paying attention. The indicator light helps, but I wish it would have been easier.
The Windows Store needs more apps. It has most of the apps that I need, but I think the ecosystem will get better with more apps. More games, more productivity tools, more niche apps.
IS IT FOR YOU?
Well, isn't it the question? Depending on your needs and what you already invested, the answer can be "yes" or "no".Let's do the "NO"s first:
- If you already have a recent ultra-book (like Lenovo X1/X220/etc, ASUS Zenbook series, etc). I'd just upgrade your ultra-book to Windows 8 and be done with it.
- If you are looking to have one-powerful-machine-to-do-them-all. If this is your need (running Photoshop, doing software dev, running VMs, playing Starcraft 2, etc) then get a robust powerful laptop instead. The Surface will never be a full laptop replacement. Or wait for the Surface PRO.
- If you are already heavily invested in Apple lines (Macbook, iPad, iPhone with all their accessories). Unless you really want to "switch".
- Your needs are similar to mine: no laptop and have other computer to run other things, need MS Office, casual gamer, with no or little investments in other tablets. I think you'll love the Surface like I do.
- Want to update or replace your old netbook and your needs are quite basic, such as email and browsing, social (Facebook, Twitter), MS Office. There is no sense of wasting $1,400 for a Macbook Pro or $1,000 for a Macbook Air if that's all pretty much you need your computer to do.
- If you are a gamer and primarily looking for a casual gaming device. An iPad or Nintendo 3DS or PSP Vita is probably better for that - or even an Android tablet like the Nexus 7. This of course can change as the Windows Store are getting more and more apps/games.
- If you are a heavy XBOX 360 user. Smartglass is awesome and being able to watch a movie on your XBOX and then continue it on your Surface is cool. Or getting extra contents of the movie you are watching, the games you are playing, etc. But, Smartglass app for iOS, Android, and WindowsPhone should be able to do the same thing.
- If you want to switch from Apple to Windows.
- The rest of all other reasons that you can think of.
Topics:
contentment,
hardware,
review,
technology,
Windows
Wednesday, August 1, 2012
How to Remote Desktop to Win7 Home
In Windows 7, you can only Remote Desktop to Windows 7 Pro, Enterprise, or Ultimate. So, for most of home users who have Windows 7 Home Premium, there is no RDP into it. Just to be clear, all Windows 7 versions can initiate a connection, but only Pro, Ent, and Ultimate can host (read here for more).
So, one of my desktop that I use for Media Center is running Home Premium - and from time to time I do need to login to it to run updates, install drivers, troubleshoot, etc. Yes, I can do it from the TV, but that means putting keyboard & mouse - which I don't want to. There is a "hack" - which basically installing the host executable in the PC - but somehow when I tried, it did not work - although the forum chatter seems to indicate that this should be relatively easy. So anyway, I decided to just put a keyboard & mouse for the time being. Until about 2 months ago, when I discover Chrome Remote Desktop (BETA)!
What is Chrome Remote Desktop? It is a Chrome extension (a plugin for Chrome browser) that enables a computer (PC or Mac) with Chrome that also has the Chrome Remote Desktop extension installed to RDP to each other. So in my case, I just installed Chrome browser and then the extension in my Media Center PC. Run the extension, it asked for my permission, give it a password, and it's ready. Then I also installed the same extension on my main PC in my office. Run the extension and - VOILA - I can RDP to my Media Center PC (running Win7 Home Premium)!
Here is the step-by-step:
If you do not have Chrome installed, go download & install it here. Go to Chrome Web Store and search for "remote desktop" and you should see result like this:


-- read more and comment ...
Here is the step-by-step:
If you do not have Chrome installed, go download & install it here. Go to Chrome Web Store and search for "remote desktop" and you should see result like this:

Click "ADD TO CHROME" and the download & installation of the extension should start. When it's done, you will see the Chrome Remote Desktop app icon shows up in your Chrome Apps.

Running the app for the first time, it will prompt you for allowing it access your computer. Click "Continue" here and then "Allow access" on the next screen.


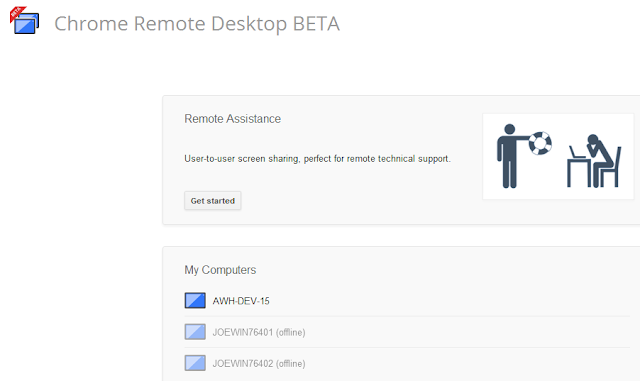
Once you allow access, now it's ready to be setup for use. Click the "Get started" button.

To enable your computer to be connected to, click the "Enable remote connections" button. You will be asked to enter a PIN, which you will use every time you need to connect to the computer.


That is it - now it's ready! If you install and enable remote connections in more than 1 computer, they will get added the list automatically. The list is tied to your Google account (GMail/Google+).

Now do the same steps above in a different computer, now you have 2 PCs that are able to RDP to each other via web. Here is the kicker: since this is via port 80, or http, this means one does not need to tweak firewall rules, install special VPN software, get dynamic DNS address, etc. As long as the computer is turned on, the Chrome extension will manage all the plumbing underneath. All you need is a broadband connection, Chrome browser & extension, and your setup/PIN.
Topics:
Chrome,
technology,
Windows
Tuesday, October 26, 2010
Smart Power Control
I setup an SSH server at home running on my Media Center box. ALL of the shows that I am recording runs at night, so during the day, other than the time it has to download updates or running some batch process, it usually goes to suspend/sleep mode - which of course makes my SSH to become unavailable.
Why not just turn on "Wake up on LAN"? Well, I tried that and it worked, but it also somehow wake up the PC when I don't want it - like in the middle of the night or on a Saturday morning, or several seconds after it goes to sleep. In the end, I basically turn-off "Wake up on LAN" and trying to find a different solution.
Basically, what I want is this:
- The PC needs to be on between 8am to 5:30pm - this the window where I usually need my SSH
- It also needs to be recording my scheduled recording in Media Center
- Other than those, it should be in suspend/sleep mode
So for a while I just put my PC to "Never" sleep and just turn it off at night and turn it back on in the morning. I moved all my scheduled maintenance stuff (virus scan, windows update, etc) to morning/afternoon. Obviously this gets to be a pain after a while - especially when I keep forgetting to turn it on or off.
So for now, I use a software called "SmartPower" - where I schedule my PC to be "ON" between certain times and/or when certain parameters are set. Here is an article in LifeHacker about it. The way to use it is basically setting your computer to "Never" sleeps, and let SmartPower take over the sleep management (instead of letting Windows doing it). So, to meet my needs, I set:
- In "Schedules" tab to awake / stay on during the weekdays between 8:15am to 11:55pm
- Under "CPU" tab, set to 27% - this is for watching recordings past midnight or on weekends
- I set my PC to awake when Media Center remote is used
Additional readings:
-- read more and comment ...
Thursday, October 7, 2010
Conditional Reference in VS 2010
In one of our projects, we are using some third party components that have separate dlls for 32 bit and 64 bit. Since our old development box and production server were 32 bit, so we used the 32 bit version. No problem whatsoever.
In a different project for different client, our development box is a 64 bit machine. But, since we are running VS 2010 and using Cassini for our debugging, we use the 32 bit reference. But since our production box is running 64 bit, last minute before build for release in our build server, we swap the reference to 64 bit, re-check-in and build. So we just keep doing it that way - until one day, we forgot to do that and a production build got pushed to production environment and (of course) it breaks. So we fix it and then we vowed to find a solution to the last minute reference swap thing.
So here is how we fix it:
In VS, right click on the project that has the reference to the 32/64bit ref, do an unload project and open using XML editor and in it, you will see something like this:
-- read more and comment ...
In VS, right click on the project that has the reference to the 32/64bit ref, do an unload project and open using XML editor and in it, you will see something like this:
...
    <PropertyGroup>
        <Configuration Condition=" '$(Configuration)' == '' ">Debug</Configuration>
        <Platform Condition=" '$(Platform)' == '' ">AnyCPU</Platform>
    </PropertyGroup>
...

    <ItemGroup>
        <Reference Include="Project.Reference.MyProject">
            <HintPath>..\References"Project.Reference.MyProject.40.x86.dll</HintPath>
        </Reference>
    </ItemGroup>
...
What you need to do is add a condition in your project file, so on certain environment it will use the x86 and x64 for other. The easiest way to do this (which is what we did) is adding a conditional statement itself on the reference element - when compiled as "debug", use the x86 dll and to use the x64 when compiled as "release". So we changed it to be like this:
...
    <ItemGroup>
        <Reference Include="Project.Reference.MyProject" Condition="'$(Configuration)' == 'Debug'">
            <HintPath>..\References\"Project.Reference.MyProject.40.x86.dll</HintPath>
        </Reference>
    </ItemGroup>
    <ItemGroup>
        <Reference Include="Project.Reference.MyProject" Condition="'$(Configuration)' == 'Release'">
            <HintPath>..\References\"Project.Reference.MyProject.40.x64.dll</HintPath>
        </Reference>
    </ItemGroup>
...
Topics:
IIS,
Visual Studio,
Windows
Thursday, August 26, 2010
VS 2008 locking up after Office 2010 install
I installed MS Office 2010 about 3 weeks ago and everything went smooth. For the most part, I have been developing in VS 2010, but lately, when I was doing code review, I have to a .NET 3.5 project in VS 2008 - and it locks up on me almost every time.
I thought it was some extension I installed or something screwed up on my project. So I uninstall all extensions, but it was still locking up. I open the project on a different computer, it was running fine, same source and references and all that.
I went to search on the internet and found out that there are some issues between VS 2008 and Office 2010 installation. One my particular issue, all I need to do is to rerun "Microsoft Visual Studio Web Authoring Component".
The setup.exe file is located at : C:\Program Files (x86)\Common Files\microsoft shared\OFFICE12\Office Setup Controller\.
So just shut down all VS 2008 instance and any Office programs and then run the Setup.exe and it should be good to go - at least that did it for me.
Credit to Martin Hinshelwood!
-- read more and comment ...
Topics:
Visual Studio,
Windows
Monday, May 10, 2010
Need wallpapers?
Want some themes or wallpapers for your multi-monitors running Windows 7? Here are some sites that I think have some cool wallpapers:
- Visual Studio 2010 Wallpapers
- I Love Windows Phone Wallpaper
- Personalization Galery from Microsoft
- Simpsons Theme
- Avatar & other bunch
Do you have any particular sites that I can add into this list? Let me know in the comments. And here is the rest of it. -- read more and comment ...
Topics:
contentment,
Photoshop,
Windows
Monday, March 15, 2010
Browsing securely using an SSH tunnel
Browsing on an internet cafe or a open/free wireless hot spot is scary sometimes. Some places are secured enough (like airport), but some are pretty questionable. You're not sure who owns the router, whether they put security on it, packet tracer, or a phising software etc ... Some times you also want to avoid the proxy that tracks your cookie, traffic, website blocker, etc etc. Regardless of the reasons, you may want to be able to browse securely - and a way to do it is by tunneling it via SSH.
So how does this work? Basically you want to setup an SSH server and redirect all of your browser traffic via this SSH server using an SSH client on your computer (instead of directly via http into the internet). This SSH tunnel is secured, so no one can peek into your traffic, unlike the regular http traffic. So here is how I did mine using Bitvise WinSSHD & Tunnelier. You can download both (free) from Bitvise website.
Installing WinSSHD (the SSH server)
- You will need a computer that is always on or with wake-up on LAN enabled. I use my media center machine for this.
- Download WinSSHD (from here) and install it. Just follow the default instruction on the screen and you should be ok. If you are not an administrator on your machine then you will need to install this as an administrator. There is a more detailed User's Guide by Bitvise here.
Configuring WinSSHD
- Once installed, the WinSSHD control panel should open with the "Easy WinSSHD Settings" window open.
- Under "Server Settings", you can customize the listening ports etc if you want - or just leave then with the default settings and click "Next" and go to "Windows Account".
- Under "Windows Account", you can allow or disallow Windows Account to login/connect to your SSH server. The default setting is to allow. I disallow this for security reason and created a locked down virtual users instead. You can read more about virtual vs Windows account here.
- Under "Virtual Users", you can add virtual users. Click "Add" and assign account name and customize the permissions for that user, then click "OK". Once the user shows up in the list, select the user row, and click the pencil icon under "Virtual account password" column and the click the "Manage" button, then set the password for that user.
- Once the "Easy WinSSHD Settings" window is gone, now you are looking at the WinSSHD control panel.
- Now click "Edit advanced settings" and go to "Windows Firewall" area. Make sure that both drop downs are set to "Open ports to any computer" - so you can connect from outside your network/internet. You can read about opening up WinSSHD to the internet here.
- Make sure the service is running. If not, start it. There should be a link in the control panel to start or stop the WinSSHD service.
Installing & Configuring Tunnelier
- Download Tunnerlier (from here) and install it. Just follow the default instruction on the screen and you should be ok. If you are not an administrator on your machine then you will need to install this as an administrator. There is a more detailed User's Guide by Bitvise here.
- Once installed, try connecting to your WinSSHD from within your network by entering the IP/host name, port, username, and password in the login area of Tunnelier and click "Login".
- You should see the status of connection and data transmission in the right text area.
- Now once it is setup within the network, before you can try it from the outside of your network, you will need to configure port forwarding in your router.
Configuring Router Port Forwarding
- A router usually has a port-forwarding tool built-in. I am not sure how each router does their setting specifically, but usually there are several simple steps to register the port-forwarding. Go to portforward.com/ for the specific instructions on how to do it for your router.
- Make sure your box that runs the SSH server is running on a static IP address within the local network. You can do this via the router's DHCP or using the TCP/IP setting in your computer.
Registering (dynamic) DNS Name
- If you are running your SSH server from home, most likely you have a dynamic IP address. So, what you want to do here is register a dynamic DNS name, so that when your IP change, it is be also updated and tied to your DNS name dynamically. In the end, all you need to remember is your DNS name. The way this works is that dynamic DNS registration company has a small software in your box that will send an updated IP address to your dynamic DNS registry so it continuously updating your DNS name registration with your current IP address.
- There are a lot of dynamic DNS provider out there in the internet - make your own pick here. I use No-IP. Usually you just need to register/create an account on their site, pick your DNS name and download the updater client software and install it on your box and you are set!
Trying It From Outside Your Network
- To do this obviously you will need to be connecting to the internet from outside your LAN
- Open up Tunnelier
- Instead of entering the internal IP address, enter the dynamic DNS name you have registered and leave everything else the same and then click "Login"
- If the port-forwarding and Windows Firewall and the account settings are set up correctly, you should be connected to your SSH server.
Setting Up Your Web Browser & Tunnelier for Secure Browsing
- Open up Tunnelier and go to "Services" tab. Make sure "SOCKS/HTTP Proxy Forwarding" is enabled. Put "127.0.0.1" for "Listen Interface", pick an unused port number (like 8081) enter it in "Listen Port" field, leave the "Server Bind Interface" to be all zeros. Basically, follow these settings in Tunnelier.
- Now in your browser, follow these settings: Firefox, Internet Explorer
- Now you are set!
Topics:
DIY,
technology,
web,
Windows
Wednesday, June 17, 2009
Twitter via Mobile Devices
You're on Twitter and use a mobile device? Here is a list of mobile device applications (obviously not exhaustive) that will hook you up to Twitter:
Windows Mobile:
Twikini
ceTwit
TwitToday
Blackberry:
Twitterberry
Blackbird
Twibble
iPhone (get from iTunes):
TweetDeck for iPhone
Tweetie
Twitterific
Twinkle
You can follow me on Twitter: http://www.twitter.com/setiabud
-- read more and comment ...
Topics:
gadgets,
technology,
Windows
Wednesday, May 6, 2009
VMWare Server 2.0 Troubleshooting
Yesterday, my VMWare Server stops working. It did not give me the login screen - so I thought maybe I just need to restart the host agent service under Services. I wrote a post about this here.
So I went to Services, found that the host agent is stopped and I restarted it. Then I got this error:
Aaaarrrrgggh!!! So anyway - I went around, googled it, read the logs, etc etc, and resolved it.
In my case the error was cause by a malformed XML file for VMWare configuration. The XML in my Win XP host is located at "C:\Documents and Settings\All Users\Application Data\VMware\VMware Server\hostd". 
I am guessing that when I installed VMWare, I probably chose "allow all users to use it" - and if you picked "allow only me", the xml files probably will reside under your username instead of under "all users".
So what I did was just opening the XML file one by one with an XML editor (I used Visual Studio) until I found the culprit XML file - which in my case was the datastores.xml - then fixed the tags and save.
Then via Services, I restarted the host agent service.
Voila! It works!
-- read more and comment ...
Topics:
virtualization,
VMWare,
Windows
Wednesday, April 8, 2009
EQATEC .NET App Profiler
Someone posted a link to this .NET Profiler tool on Twitter (Twitter FTW!) - so I went and downloaded it and tried it. The tool is called EQATEC Profiler (you can download it here). So what is it?
The way it works it that it rebuild your dlls/exes so when you run it, the tool will be able to profile your .NET method calls and give you a report. Based on the report, you can see which method is the slowest, which one is being called the most number of times, etc. The hope is that based on that data then you can optimize your application to maximize the speed/performance.
When you downloaded the app, it comes with a sample WinForm app. You can use it to see how it works. When it finds the exe/Main() method, it will use it as a starting point when you run it.
My application is an ASP.NET MVC application - so it does not have a Main() method. How do I then profile it? When you open the profiler, this the screen you will see. Click browse on the top right - and browse to your ASP.NET application bin directory. You can select a dll OR not select any file and just the folder (which will select all dlls in the bin folder). Hit "OK" then make sure all the dlls that you want to profile is checked. Hit the "Build" button on the lower right. Once it's done, you will see that there is a message in the message box saying that it does not find a Main() method. This is OK. Click "Open output folder" on the lower left, and copy all dlls in there back into your original bin folder. Then run your web application (Do NOT run it by hitting F5 - which will overwrite all the dlls from EQATEC. But run it by opening a browser and type "http://localhost:<port>/<appname>". At this point the EQATEC is already attached to your ASP.NET web app process and ready to profile it. So run through your web app (like doing a comprehensive walk-through) and before you are done, click "Run" tab on the EQATEC profiler then hit the "Take snapshot" button. If you are done at this point, you can close your browser. You can take a snapshot anytime you want and they are accumulative - so if you took 5 snapshots, the latest one will have the most comprehensive data out of the 5.
 Now highlight the top most (or latest) snapshot you have taken, then click "View" button on the lower right of the "Run" tab. It displays the break-down of all of your method calls during the walk-through. The telemetry includes:
From those data, we should be able to see what method takes the longest to execute and optimize it if necessary - OR - why is a particular method is being called hundred of times and accumulate cost over time and maybe we can put caching to reduce it, etc etc.
Overall, I like this tool as it provides me a way to pin-point the bottlenecks in my application and take action accordingly, instead of just guessing or doing a manual measurement - which is painful and tedious.
-- read more and comment ...
Topics:
ASP.NET,
technology,
web,
Windows
Tuesday, February 10, 2009
Outlook Filter/Rule to Remove Spam from YOURSELF?
My MS Outlook Exchange account is littered with SPAM - so I turned on the junk email filter on. This enables the auto rules that move "junk"-ish email into the junk mail folder. It does not move all junk email to junk mail folder but for the ones that pass through the filter I can individually right click and include them as junk, so the next time the same email address sends me anything, it will be considered as junk.
So, I am golden, right? Yes ... for a while ... until I start to get junk emails from MYSELF. I am pretty sure that my computer is clean from adwares, viruses, etc. So, it must be that the spammers have gotten my email address and they are spamming me using it. If I try to include those email in the blocked senders list, I can't - since the sender's address is my own email address.  To handle this, initially I create a filter to block certain subjects (since they are all have similar subjects). This works for a while. But as time goes, I have to keep adding and adding more subjects into my rules - which becomes very large. There must be an easier way!
Here is how I solved the problem above:
I created a new rule in Outlook, and the rule is basically checking my email header. So I check for email sent by my email address but is not sent from my Exchange server and move those to junk mail folder (and stop processing any more rules). Voila! Now my Inbox is clean and I can remove my bloated "subject" rule.
-- read more and comment ...
Topics:
contentment,
technology,
Windows
Tuesday, January 27, 2009
How to Increase/Enlarge Hard Drive Space in a VM
Cannot enlarge hard drive space?
First of al, to enlarge your hard drive space, you will need to turn off the VM. Highlight your VM and under disk, click EDIT and there should be a link to enlarge your drive space. This option will be disabled if you have taken snapshots of your VM. So in this case, delete/collapse the snapshots and then enlarge the drive space.
If you breaking your VM into 2GB chunks, you will need to do it from the command line.
The command line to do it is this:
vmware-vdiskmanager
The full syntax is this (assuming you want to increase it to 10GB and your disk filename is myDisk.vmdk located in F:/VMs/MyVm/):
vmware-vdiskmanager -x 10GB "F:/VMs/MyVM/myDisk.vmdk"
You will need to run the command from VMWare directory - in VMWare Server 2.0, the directory is located at "C:\Program Files\VMware\VMware Server". So open a command prompt, navigate to the VMWare dir and execute the command above.
The command will run for a while and after it is done, it will give you a message indicating whether the expansion is successful or not.
Now once the diskspace is increased, you will need to expand the file system to its max capacity. Running the command above or through the VMWare interface only increase the max capacity of the disk, but the size of the allocated size used by the VM is still at the old size. There are several ways to do this:
1. Mount your VMDK file to you host machine using vmware-vdiskmount and then expand it using DISKPART from your host OS (vmware-vdiskmount is only available for VMWare Infrastructure & Workstation). I think you can download it from here but I have never tried to use it with VMWare Server - so try at your own risk.
2. Mount your VMDK to another VM (it has to be the same harddrive controller - SCSI/IDE) and then expand it using DISKPART from your second VM. To mount the VMDK into your second VM, follow these steps: a) Make sure both VMs are shut down b) Highlight/Focus on your second VM and click "Add Hardware" under "Commands" box, select "Hard Disk", then select "Use an Existing Virtual Disk". Browse to your first VM VMDK file and make sure the type is the same as your expanded VM under "Virtual Device Node". c) After completing the wizard, you should see the mounted drive under Hard Disk within your hardware list. d) Start your second VM e) Run DISKPART.
3. You can also use 3rd party tools such as Partition Magic or other similar tools.
Related Posts:
VMWare Server Experience
Win XP 64 bit and VMWare Server
-- read more and comment ...
Topics:
gadgets,
technology,
virtualization,
VMWare,
Windows
Wednesday, January 14, 2009
XP 64 and VMWare Server
With Windows XP 64 bit Edition, I wanted to install VMWare Server 2.0 - the installation failed. It will do all the installation preparation and then close itself without installing anything.
Googling it around using keywords like "XP64 VMWare Server" did not yield any meaningful results (at least not in the first 4 pages or so). I almost thought that XP 64 is not compatible with VMWare Server 2.0 - but the readme says it should be OK.
After asking around, my boss at work told me that there is patch/hotfix from Microsoft that I need to install to get this working. The patch is about multiple processors and virtualization that requires processor management.
There is a KB article about this: KB896256 and you can download the patch from there.
If you are running AMD processors, you also want to apply this hotfix & drivers from AMD.
And here is the rest of it.
-- read more and comment ...
Topics:
virtualization,
VMWare,
Windows
Subscribe to:
Posts (Atom)


 Posts
Posts


