Around fall 2020, my old desktop PC was on its last leg (it was running Intel Core Quad 9300 - so it was super old). I decided to get a reasonable powerful laptop with a dock that can drive two 2K (2560x1440) and one 1920x1200 monitors. So I purchased a X1 Carbon Extreme Gen 2 (running i7-9750H, 32 GB RAM) and Thinkpad Thunderbolt 3 Workstation Dock Gen 2 (40AN) - and I also purchased the Premier Support. But soon, it was apparent to me something was wrong. Lenovo and their team has been very professional in responding to the issue. Every call I made to the Premier Support team or email exchanges have been helful and courteous. They deserve a lot of credit in investigating the issue and trying to find a good resolution with me. In short, to the user (me), the external monitors will blink (goes blank and comes back within a second or less) and some times will go blank for a period of time (ranging from two seconds to several minutes, or in some minor instances actually never come back). After about 8 weeks, Lenovo admitted that there is a bug in their dock - or to be precise in the chip (from Synaptics) they are using in the dock. The bug is related to HDCP - which is digital copy protection to prevent copying of digital audio and video content (i.e. during streaming). Since this chip is being used in all their TB3 docks (and Lenovo said also being used in other brands like DELL and HP docks) and it cannot be fixed via firmware update, so Lenovo said they do not have a workable solution for this issue (for me and other dock owners). I ended up trying to get a refund for my dock.
I always use my laptop with the lid close, connected to the dock with the provided custom cable (which provide TB3 connection and power), with everything else connected to the dock (3 monitors, USBs, network).
The problem starts with intermittent screen flickering - which I initially dismissed as just small annoyance or maybe lose connection/cable. But it got to the point where it was annoying enough for me and I contacted Lenovo Premier Support. I started my case on January 4th and after about 11 weeks - it is now closed (but not resolved).
It also happened with https://eshop.macsales.com:
If you are interested in the chronological timeline of the saga, here it is:
For the video recordings of the issue - they are available here and here.
-- read more and comment ...


Tuesday, March 23, 2021
Lenovo Thinkpad TB3 Dock Saga
Topics:
dock,
gadgets,
hardware,
Lenovo,
performance,
technology,
thunderbolt,
Windows
Wednesday, June 20, 2018
Switched to Project Fi and Save Some Money!
For the longest time until October 2017, I was a faithful T-Mobile subscriber for my mobile phone. They offered the perfect combination of package that I need: 5 GB of high-speed data (it was 3G, 4G, and then LTE over-time), unlimited SMS, and some non-unlimited voice (100 minutes) - all for $30 per month. I was on that plan for years (along with my wife's phone). So we are paying around $64 per month for our cellphone bills combined. We both rarely talk over the phone, most of our communication is happening via data (SMS, WhatsApp, Slack, Skype, etc), and we also have a home phone (VOIP) that we use for long-calling (like calling family members, customer supports, etc etc that are minutes intensive).
I have heard about Project Fi when it came out - somehow it was not that attractive for me at the time. Until I have to buy a new phone ...

How does it save me money? I thought paying ~$30 per month is cheap already!? Project Fi simplifies your billing - so basically the main account holder must pay $20 per month for the main line - which includes unlimited talk and text. Now on top of it, you only pay for the data that you use with rate $10 per GB. So if I am only using .5GB this month, I will only billed for ~$25 before tax. I don't know about you - but in my day-to-day, 80-90% of the time I am always connected to WiFi (home, office, my friend's house, free WiFi at a coffee shop/restaurant, etc) - and I have my stats too from the last year of my T-Mobile which shows that on average that I only use around 0.7GB of LTE data per month. With that, I am potentially saving $5-$7 per month - not much, I know - but I gain so much more (better coverage, unlimited call, better support, and simplified billing).
Then ... Google released this app call Datally. You can read more about it here. Which basically allows you to control data usage on an app-by-app. The default setting is to not allow data if the app is not on the foreground. So by installing this app, my LTE data usage actually goes down from ~0.7GB to ~0.5GB per month.
Better with more people! It gets better! I switched my wife's provider from T-Mobile to Project Fi - now because she is not the main account holder (her account is working under my account), she is only billed $15 per month (for unlimited calls and text) instead of $20 (like me because I am the main/primary account). Then our data usage is combined and billed together. So what this means is that if we are assuming that her data usage is similar like me (between 0.5-0.7GB of LTE data per month), at the end of the month our combined cell phone bill is ~$49 ($20 + $15 + $7 + $7) before tax - which is ~$12-$14 saving per month. Not much, but we'll take it.
Bill Protection Benefit! Project Fi has other advantages - such as: "Bill Protection" - which is a cap of your bill (not your data usage), but a cap of actually how much Google can actually bill you. The cap is $60 for your LTE data. So if you are on a single account plan, that would $80 total ($20 phone & text + $60 data). Or a different way to look at it is this is the "Unlimited Plan" for Project Fi subscriber.
Free International SMS & Data! With Project Fi, you can use SMS and data freely (already included) in around 170 countries. You can also make or receive phone calls, but it is not free.
You can read more about Project Fi here.
Topics:
Android,
contentment,
family,
Google,
technology
Sunday, June 17, 2018
Drawing Multiple Routes In One Map with Google Map
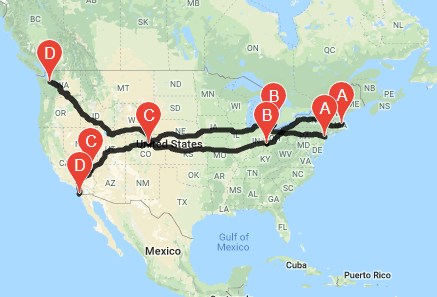
The purpose of this task is to compare the routes. Assuming, like the example above, I am going from Boston to Seattle - which route will be better? Or maybe closer to passing Detroit?
Or another use case: if my friend and I are both traveling out of NYC on 2 separate cars, I am going to Columbus, OH and my friend is going to Detroit, MI - and another friend needs to be dropped off in State College, PA - so which car should this friend join - my car or the other car?
So here is how you do it.
FIRST - you will need to get Google Map Javascript API Key - you can get it here. Once you get it and enable the needed APIs, you will need to use it in your script reference below.
SECOND - in your HTML markup - add script reference Google Map and substituting the YOUR_API_KEY with your real API key from above.
-- read more and comment ...
FIRST - you will need to get Google Map Javascript API Key - you can get it here. Once you get it and enable the needed APIs, you will need to use it in your script reference below.
SECOND - in your HTML markup - add script reference Google Map and substituting the YOUR_API_KEY with your real API key from above.
<!DOCTYPE html>
<html>
<head>
<style type="text/css">
    #map {
        margin-top: 10px;
        height: 750px;
        width: 100%;
    }
</style>
</head>
<body>
 <div id="map"></div>
 <script async defer src="https://maps.googleapis.com/maps/api/js?key=YOUR_API_KEY&callback=initMap" type="text/javascript"></script>
</body>
</html>
THIRD - initialize several global variables and create a javascript method called "initMap" - this is to initialize your map once the script from Google is loaded.
var routeMapArray = [];
var map;
var defaultZoom = 11;
var directionsService;
var directionDisplayRenderEngineArray = [];
var iconColor = '';

function initMap() {
  routeMapArray = [];
  directionsService = new google.maps.DirectionsService();

  // center initially on NYC
  loadMap(new google.maps.LatLng(40.7128, -74.0060));
}
FOURTH - Create a method called "loadMap" that takes 1 parameter and create a json payload for your routes.
var loadMap = function(center) {
  var mapOptions = {
    zoom: 11,
    mapTypeControl: false,
    streetViewControl: false,
    mapTypeId: google.maps.MapTypeId.ROADMAP
  };

  if (center !== undefined && center !== null) {
    mapOptions.center = center;
  }

  // Some basic map setup (from the API docs)
  map = new google.maps.Map(document.getElementById('map'), mapOptions);

  // Start the request making
  var requestArray = [{
      "origin": "New York, NY",
      "destination": "Seattle, WA",
      "waypoints": [{
          "location": "Detroit, MI",
          "stopover": true
        },
        {
          "location": "Denver, CO",
          "stopover": true
        }
      ],
      "travelMode": "DRIVING"
    },
    {
      "origin": "Boston, MA",
      "destination": "San Diego, CA",
      "waypoints": [{
          "location": "Dayton, OH",
          "stopover": true
        },
        {
          "location": "Las Vegas, NV",
          "stopover": true
        }
      ],
      "travelMode": "DRIVING"
    }
  ];
  processRequests(requestArray);
};
FIFTH - We need to process the requests in order, one by one - using different renderer each time on the same map (this is the key).
var processRequests = function(requestArray) {
  var bounds = new google.maps.LatLngBounds();
  var infoWindow = new google.maps.InfoWindow();

  // Counter to track request submission and process one at a time;
  var i = 0;
  var position = "";

  // Used to submit the request 'i'
  var submitRequest = function() {
    if (requestArray.length === 0) return;
    directionsService.route(requestArray[i], processDirectionResults);
  };

  // Used as callback for the above request for current 'i'
  function processDirectionResults(result, status) {
    if (status === google.maps.DirectionsStatus.OK) {
      // Create a unique DirectionsRenderer 'i'
      directionDisplayRenderEngineArray[i] = new google.maps.DirectionsRenderer();
      directionDisplayRenderEngineArray[i].setMap(map);

      if (i == 0) {
        bounds = new google.maps.LatLngBounds();
      }
      iconColor = "#000000";

      directionDisplayRenderEngineArray[i].setOptions({
        preserveViewport: true,
        polylineOptions: {
          strokeWeight: 5,
          strokeOpacity: 0.8,
          strokeColor: iconColor
        },
        markerOptions: {}
      });

      // Use this new renderer with the result
      directionDisplayRenderEngineArray[i].setDirections(result);

      // adjust zooming
      if (i === 0) {
        bounds = directionDisplayRenderEngineArray[i].getDirections().routes[0].bounds;
      } else {
        bounds.union(directionDisplayRenderEngineArray[i].getDirections().routes[0].bounds);
      }

      map.fitBounds(bounds);
      if (map.zoom > defaultZoom) {
        map.setZoom(defaultZoom);
      }

      // and start the next request
      setTimeout(function() {
        nextRequest();
      }, 500);
    }
  }

  function nextRequest() {
    // increment counter
    i++;

    // next request if any
    if (i >= requestArray.length) {
      // No more to do
      return;
    }

    // submit next request
    submitRequest();
  }

  // begin processing
  submitRequest();
};
SIXTH - Done. Make. profit. Here is a working JSFiddle for it.
Topics:
Google,
javascript,
trip
Monday, March 23, 2015
Best Dishes in Columbus
I have lived in Columbus more than half of my life and throughout the years I have a growing food & dishes that I think are the best in the city. So without further ado, here they are. If you have any suggestions, please leave them in the comment.
The list will be in CATEGORY - RESTAURANT - NAME OF DISH
East-Asian Food
Latin Food
Western Food
-- read more and comment ...
East-Asian Food
- Tofu Dish - Happy Dragon (Livingston Ave) - Pipa Tofu
- Hand-made Noodle - Jiu Thai (Bethel Rd) - Beef Stretch Noodle
- Pho (Vietnamese Noodle Soup) - Buckeye Pho (Bethel Rd) - Pho Dac Biet
- Phad Thai - Bangkok (Refugee Rd) - Phad Thai
- Salt & Pepper Squid - Panda Inn (Bethel Rd) - Salt & Pepper Calamari
- Spicy Diced Chicken - Coco's Grill (5th Ave) - Hot Spicy Chicken (extra crispy)
- Dumplings - Sesame Sea (Muirfield Dr) - Firecracker Wontons
- Pork Chop - Sun Flower (Sawmill Rd) - Crispy Ribs
- General Tso Dish - General Tso's Restaurant (Godown Rd) - General Tso's Beef
- Sushi Dish - Akai Hana (Old Henderson Rd) - Any Sushi
- Chicken Wings - Yau's Bistro (N High St) - Spicy Wings
- Spicy Pork - Happy Dragon (Livingston Ave) - Jalapeno Pork
- Pork Belly Dish - Little Dragon (Morse Rd) - Mecai Pork
- Crispy Whole Chicken - Pacific Eatery (Kenny Rd) - Crispy Chicken
Latin Food
- Pastor (pork) Taco - Los Guachos Taqueria (Godown Rd) - Pastor Taco
- Fish Taco (fried) - El Arepazo (Pearl St) - Fish Taco
- Empanada - El Arepazo (Pearl St) - Pork/Beef Empanada
- Latin Sandwiches - Si Senor (Lynn St) - Chicharrón Peruano
- Huevos Rancheros - Star Liner Diner (Cemetery Rd) - Huevos Rancheros
- Chiliquiles - Star Liner Diner (Cemetery Rd) - Chiliquiles
- Cheese Empanada - El Manantial Latino (Hudson St) - Cheese & Pineapple Empanada
- Pork Belly Taco - Nada (Nationwide Blvd) - Crispy Pork Belly Taco
Western Food
- Classic Calamari - Eddie Merlot (Polaris) - Sesame Calamari
- Pork Belly - The Market Italian Village (Summit St) - Braised Pork Belly
- Chicken Wings - Rooster's - Chipotle Garlic Wings
- Gyro - Yanny's (Cleveland Ave) - Small Lamb Gyro
- Pizza - Benny's Pizza (Marysville) - BLT Pizza
Sunday, March 22, 2015
Installing DNN Platform in Azure Website
I was installing DNN Platform on an Azure Website following this documentation on DNN website. But, for whatever reason, my installation never finished and stopped at 18% and gave up. The log button shows nothing. Trying the "Retry" button produces SQL error for basically trying to create existing DB elements.
So I proceeded to delete my website and its DB - and try again from scratch. But after 2-3 times trying and getting the same result over and over again, I started to dig into the internet and found this post - which basically saying:
After installing the website and prior to installing the DNN platform, change the scale from "FREE" to "STANDARD" on your website. Stop & restart - and then proceed to install DNN.
-- read more and comment ...
After installing the website and prior to installing the DNN platform, change the scale from "FREE" to "STANDARD" on your website. Stop & restart - and then proceed to install DNN.
Topics:
Azure,
DNN,
technology,
web
Tuesday, March 10, 2015
Tire Tips For Your Car
In maintaining a car, tire purchase is always expensive but necessary. Every 4-5 years on average, you need to replace your tires. Depending on the size/measurement and type of your tires, this could translate to $300 to $1,000 to just purchasing new tires alone. Then adding cost of balancing, mounting, getting rid of your old tires, etc - you add another about $40 per tire. Although you only do this every 4-5 years, it is still quite costly. So how can we do some cost saving in this tire related stuff?
TIRE LIFETIME
Using your tire as long as possible is one way to do it, but if you are using bald tire, it can be very dangerous. So how can we get the best lifetime of our tires? There are three simple principles: tire pressure, balancing, and alignment. If you keep these 3 things in line then you have the possibility to get the most out of your tire lifetime. These 3 things basically deal with the evenness of your tire thread wear. If you have under-inflated tire(s), or an unbalanced tire(s), or misaligned car, it will create uneven wear - which will reduce the lifetime of your tire.
TIPS:
TIRE PURCHASE
You can get your tire measurements from your own tire, just look at the side wall and it will be written there, usually in this format: XXX/YY/RZZ. My minivan has these measurements: 235/65/R16. Or, you can go to www.tirerack.com and enter your car's year, make, and model - then it will tell you the original tire sizes/measurements.
Once you have your measurements/sizes, go to www.tirerack.com, click "Tires" and then "Survey Results". Now depending on your car type, and tire type, you want to select the tire type that you want. A few tips: "Summer" tire is unusable in the winter time, "Winter" tire is usable in non-winter times but has short lifetime. Since I live in Ohio, I always buy an "All Season" tire - which means I don't have to replace the set of tire seasonally. So I open each "All Season" option in a new tab in my browser and enter in my tire size on the left side under "FILTER BY" of the window and close the tabs that yielded no results. From that point on, it is just a matter of taste, preference, price, and survey results. For example, for my minivan (235/65/R16), I am choosing General AltiMAX RT43 (T-Speed Rated) as my top pick. Now if you are buying new tires, you put the tire in your basket, and pay and checkout from TireRack.com - you can ship it to your home, in which then you will need to take them to the tire shop to be installed later on, or you can ship them directly to the tire shop that you will be installing (assuming you already made an appointment with them).
TIPS:
PURCHASING USED TIRES
Another option is to buy used tires. There is a huge market for used tires - from junk yards, people swapping rims & tires, etc. These tires usually still have about 50-90% thread left, which means 2-4 years (or more). Now why used tires? Because they are "CHEAP" - I am talking REALLY REALLY CHEAP. Here is an example, a new tire for Continental ProContact (245/45/R18) cost about $210 per tire. In the used market, with 80% thread, you can get one for about $50-$60 (including mounting, balancing, and disposing your old tire). If you are not picky about brand, you can get cheaper ones that only cost about $35-$45 per tire for that size. For smaller size (for like a Civic or an Elantra etc), it can be cheaper still. I have seen someone walk out the door with 4 tires installed, balanced, and dispose old tires for $100. Getting used tire(s) is ideal when you do not need a whole set - sometimes you just need 1 tire or maybe a pair because of flat, sidewall damage, etc. Used tires are not ideal if you are a stickler to a particular brand/type, or if you have rare sizes - since they are used and cannot be special ordered.
TIPS:
My tire store is Katz Tires. They are old-school, been in Columbus forever, well-known tire shop in Columbus. They sell new and used tires. Their service is always impeccable, fast, economical, satisfaction guaranteed. They are a tire shop - so they sell, mount, and fix tires - nothing else. Katz is always the first shop I call if I need a used tire or a plug/patch. Here is a story where they just treat you above and beyond: I came in the other day because of a leak in one of my tire. My tire pressure indicator alerted me about it and I need to put about 10 psi of air every week. So after 2 weeks of leakage, I brought it to Katz. They took care of me right away, dismounted the wheel, checked for leaks, inspected the tire, and after 10 minutes or so, one of their staff came to me and said that they could not find a leak. I told them my story and they thought it was a just small leakage from dirty rim lip. So they cleaned the rim and the tire, remounted the tire into the rim, re-balanced the wheel, mounted the wheel into the car. When the staff gave me my key back and I was ready to pay - he said "free of charge, no need to pay". So I was a bit confused and asked him "Really? Are you sure?" He replied, "Absolutely. 100%. Bring it back if it still leaking and we will take another look." He just won a customer for life.
Don't believe me about Katz? Check out their Yelp review.
There is also a Firestone nearby my house where I do all my lifetime balancing and alignments. They treat me right, rarely push any services beyond what I need, and they are close to there I live. I also like Discount Tire, they are generally great, but they do not do alignment. So balancing & alignment in separate places just create too much hassle for me.
-- read more and comment ...
Using your tire as long as possible is one way to do it, but if you are using bald tire, it can be very dangerous. So how can we get the best lifetime of our tires? There are three simple principles: tire pressure, balancing, and alignment. If you keep these 3 things in line then you have the possibility to get the most out of your tire lifetime. These 3 things basically deal with the evenness of your tire thread wear. If you have under-inflated tire(s), or an unbalanced tire(s), or misaligned car, it will create uneven wear - which will reduce the lifetime of your tire.
TIPS:
- The standard manufacturer recommended tire pressure usually listed on a sticker inside one of your door.
- Most tire shop/place (Firestone, Goodyear, DiscountTire, etc) will check pressure and inflate your tire for free of charge.
- Most tire shop (at least I know Firestone, NTB, and DiscountTire) have a lifetime balancing deal. So you pay a fee ($15 per tire), but then you can balance your tires anytime you want as long as you own the same set of tires. I balance my tires every 6,000 miles or every 6 months. This is a lot cheaper compared to what the car dealership is charging you.
- Most tire shop (at least I know Firestone) have a lifetime alignment deal. So you pay a fee ($170 at Firestone), but then you can your car anytime you want as long as you own the car (some places only goes for 3-4 years). I check my alignment every time I balance my tires - every 6,000 miles or every 6 months. For a single standard alignment, it usually costs you about $70 - so within 3 alignments, I already got my money's worth.
TIRE PURCHASE
You can get your tire measurements from your own tire, just look at the side wall and it will be written there, usually in this format: XXX/YY/RZZ. My minivan has these measurements: 235/65/R16. Or, you can go to www.tirerack.com and enter your car's year, make, and model - then it will tell you the original tire sizes/measurements.
Once you have your measurements/sizes, go to www.tirerack.com, click "Tires" and then "Survey Results". Now depending on your car type, and tire type, you want to select the tire type that you want. A few tips: "Summer" tire is unusable in the winter time, "Winter" tire is usable in non-winter times but has short lifetime. Since I live in Ohio, I always buy an "All Season" tire - which means I don't have to replace the set of tire seasonally. So I open each "All Season" option in a new tab in my browser and enter in my tire size on the left side under "FILTER BY" of the window and close the tabs that yielded no results. From that point on, it is just a matter of taste, preference, price, and survey results. For example, for my minivan (235/65/R16), I am choosing General AltiMAX RT43 (T-Speed Rated) as my top pick. Now if you are buying new tires, you put the tire in your basket, and pay and checkout from TireRack.com - you can ship it to your home, in which then you will need to take them to the tire shop to be installed later on, or you can ship them directly to the tire shop that you will be installing (assuming you already made an appointment with them).
TIPS:
- If you are buying new tires from the big-box store, always go to Discount Tire. They always have the best price. Always. They even price-match.
- Always ask for lifetime balancing during your installation - you pay a bit more, but worth it. Read "TIRE LIFETIME" above.
- Never go to Monroe, Walmart, Sears, Midas, Meineke
- If you prefer local store instead of the chain-shops, go to Katz Tires in Columbus. Good people, fast, awesome prices, excellent customer satisfaction
PURCHASING USED TIRES
Another option is to buy used tires. There is a huge market for used tires - from junk yards, people swapping rims & tires, etc. These tires usually still have about 50-90% thread left, which means 2-4 years (or more). Now why used tires? Because they are "CHEAP" - I am talking REALLY REALLY CHEAP. Here is an example, a new tire for Continental ProContact (245/45/R18) cost about $210 per tire. In the used market, with 80% thread, you can get one for about $50-$60 (including mounting, balancing, and disposing your old tire). If you are not picky about brand, you can get cheaper ones that only cost about $35-$45 per tire for that size. For smaller size (for like a Civic or an Elantra etc), it can be cheaper still. I have seen someone walk out the door with 4 tires installed, balanced, and dispose old tires for $100. Getting used tire(s) is ideal when you do not need a whole set - sometimes you just need 1 tire or maybe a pair because of flat, sidewall damage, etc. Used tires are not ideal if you are a stickler to a particular brand/type, or if you have rare sizes - since they are used and cannot be special ordered.
TIPS:
- Know what you want in terms of sizes and brand/type. I would use the survey from TireRack to narrow down my list of brands/types.
- Call lots of places and compare prices, thread-wear, and availability. In Columbus alone there are about 20+ used tire shops.
- Read shops review. Some shops are really friendly, nice, and professional. Some are just plain rude and questionable.
My tire store is Katz Tires. They are old-school, been in Columbus forever, well-known tire shop in Columbus. They sell new and used tires. Their service is always impeccable, fast, economical, satisfaction guaranteed. They are a tire shop - so they sell, mount, and fix tires - nothing else. Katz is always the first shop I call if I need a used tire or a plug/patch. Here is a story where they just treat you above and beyond: I came in the other day because of a leak in one of my tire. My tire pressure indicator alerted me about it and I need to put about 10 psi of air every week. So after 2 weeks of leakage, I brought it to Katz. They took care of me right away, dismounted the wheel, checked for leaks, inspected the tire, and after 10 minutes or so, one of their staff came to me and said that they could not find a leak. I told them my story and they thought it was a just small leakage from dirty rim lip. So they cleaned the rim and the tire, remounted the tire into the rim, re-balanced the wheel, mounted the wheel into the car. When the staff gave me my key back and I was ready to pay - he said "free of charge, no need to pay". So I was a bit confused and asked him "Really? Are you sure?" He replied, "Absolutely. 100%. Bring it back if it still leaking and we will take another look." He just won a customer for life.
Don't believe me about Katz? Check out their Yelp review.
There is also a Firestone nearby my house where I do all my lifetime balancing and alignments. They treat me right, rarely push any services beyond what I need, and they are close to there I live. I also like Discount Tire, they are generally great, but they do not do alignment. So balancing & alignment in separate places just create too much hassle for me.
Saturday, February 21, 2015
Using GMail as email service from Azure
Following these posts:
- Create a secure ASP.NET MVC 5 web app with log in, email confirmation and password reset
- How to Send Email Using SendGrid with Azure
Here is the SendGrid code:
-- read more and comment ...
        private static async Task SendGridSendAsync(string to, string from, string subject, string body)
        {
            var myMessage = new SendGridMessage();
            myMessage.AddTo(to);
            myMessage.From = new System.Net.Mail.MailAddress(
                                "my.service.email.address@gmail.com", "my.service");
            myMessage.Subject = subject;
            myMessage.Text = body;
            myMessage.Html = body;

            var credentials = new NetworkCredential(
                       "sendGridAccount", "sendGridPassword"
                       );

            // Create a Web transport for sending email.
            var transportWeb = new SendGrid.Web(credentials);

            // Send the email.
            if (transportWeb != null)
            {
                await transportWeb.DeliverAsync(myMessage);
            }
            else
            {
                Trace.TraceError("Failed to create Web transport.");
                await Task.FromResult(0);
            }
        }
Here is the GMail code:
        private static async Task GmailSendAsync(string to, string from, string subject, string body)
        {
            var sentFrom = (string.IsNullOrEmpty(from) ? "my.service.email.address@gmail.com" : "my.service");

            // Configure the client:
            System.Net.Mail.SmtpClient client = new System.Net.Mail.SmtpClient("smtp.gmail.com");

            client.Port = 587;
            client.DeliveryMethod = System.Net.Mail.SmtpDeliveryMethod.Network;
            client.UseDefaultCredentials = false;

            // Creatte the credentials:
            System.Net.NetworkCredential credentials = new NetworkCredential(
                 "gmailAccount", "gmailPassword"
                 );
            client.EnableSsl = true;
            client.Credentials = credentials;

            // Create the message:
            var mail = new System.Net.Mail.MailMessage(sentFrom, to);
            mail.Subject = subject;
            mail.Body = body;

            await client.SendMailAsync(mail);
        }
Topics:
ASP.NET,
C#,
MVC,
technology
Friday, January 30, 2015
Explicit operator
According to MSDN, explicit operator keyword declares a user-defined type conversion operator that must be invoked with a cast. This is super handy if you are doing a lot of conversion/translation in your code.
Here is an converting between two separate classes, Person and Contact - which have translatable properties between them.
public class Contact {
        public string Name { get; set; }
        public string PrimaryPhone { get; set; }
        public string PrimaryEmail { get; set; }
}

public class Person{
        public int PersonId { get; set; }
        public string FirstName { get; set; }
        public string LastName { get; set; }
        public string HomePhone { get; set; }
        public string HomeEmail { get; set; }
        public string WorkPhone { get; set; }
        public string WorkEmail { get; set; }
        public string CellPhone { get; set; }
}
Then, you can create an explicit conversion operator such as this:
-- read more and comment ...
public static explicit operator Contact (Person person)
{
    return new Contact
    {
          Name = person.FirstName + " " + person.LastName,
          PrimaryPhone = (String.IsNullOrEmpty(person.CellPhone) ?
                  (String.IsNullOrEmpty(person.WorkPhone) ?
                  person.HomePhone : person.WorkPhone) : person.CellPhone),
          PrimaryEmail = (String.IsNullOrEmpty(person.WorkEmail) ? person.HomeEmail : person.WorkEmail)
    };
}
Here is how you would use it:
Contact contact = (Contact)person;
Topics:
C#,
Visual Studio
Tuesday, January 20, 2015
Enabling IIS Express to Accept External Request
I am doing a web development project where the web application needs to look good on all browsers (on Mac and PC - Win7 and Win8) and mobile devices (iPad, Windows Phone, Android, etc). So most of my testing can be done in my development machine - either by running an emulator from Visual Studio, or letting the browser (i.e. Safari) emulate iPad/iPhone resolution. This probably solved 95% of the issues and problems. But, then I still want to do a real device test - where I actually run the web application and browse to it from an iPad, or a Mac, from an Android phone, etc.
Of course - the ideal solution is just to put the web application somewhere on the internet (i.e. http://mytestwebsite.mydomain.com) and let the testing begin. But unfortunately, I do not have the luxury of a QA or test site. So I just have to run it locally.
I can set it up on my IIS, but that seems to be a hassle - removing/stopping my current site running in IIS, setting up this new site, creating all the permissions, app pool, etc. Too much overhead for simple testing. Can I just hit F5, or run the IIS Express and make it accepting external request - so I can hit the site from outside of my dev machine? YES!
Allowing everyone to access http://mydevmachine:80
Open up an admin elevated command prompt and type in this command:
netsh http add urlacl url=http://mydevmachine:80/ user=everyone
Open up firewall
Now, we need to open up the Windows Firewall for allow traffic to go through. In the same command prompt from above, type in this command:
netsh firewall add portopening TCP 80 IISExpressWeb enable ALL
Configure IIS Express
Lastly, we need to add our machine name into the IIS Express configuration. You can find the config file located in C:\Users\
<site name="Domain.Site.Mvc" id="4">
    <application path="/" applicationPool="Clr4IntegratedAppPool">
        <virtualDirectory path="/" physicalPath="c:\Projects\Domain.Site\Domain.Site.Mvc" />
    </application>
    <bindings>
        <binding protocol="http" bindingInformation="*:12555:localhost" />
        <binding protocol="http" bindingInformation="*:80:mydevmachine" />
    </bindings>
</site>
Now, I can start my site on my dev machine and then browse to it from separate machines, Mac machine, phone, tablets, etc by just going to http://mydevmachine/. With the exception of an iPad. For whatever reason, iPad does not allow browsing to a local machine name - it has to be a fully qualified domain name. I will write a solution to this on a separate blog post.
Topics:
ASP.NET,
IIS,
iPad,
technology,
Visual Studio,
web
Tuesday, October 29, 2013
Custom Textbox Editor Template
ASP.NET MVC's built-in editor template is awesome - by just decorating your model, the Html helper EditorFor knows how to read those attributes and display appropriate html elements and html attributes, including validation, display name, or even using custom templates that we specify through DataType or UIHint attributes.
Now, all my string properties in my models have string length attribute, to prevent truncation when they being saved in the database, or for formatting reason. Now the built-in Html helper EditorFor is not smart enough to translate that StringLength attribute to the actual html attribute of maxlength. Secondly, it is also not smart enough to adjust the width of the textbox based on that StringLength - so a ZipCode property which only need 5 characters should have smaller textbox compared to a CompanyName property which needs 50 characters.
So I made an editor template that do just that. You can copy the code below, put it in a partial view called "string.cshtml" placed within "EditorTemplates" folder under "/Views/Shared/". I use Twitter Bootstrap css to adjust my textbox width (using "input-mini", "input-large" classes) - feel free to substitute them with whatever you are using.
-- read more and comment ...
@model String
@using System.Globalization
@using System.Linq
@{
    IEnumerable validators = ModelValidatorProviders.Providers.GetValidators(ViewData.ModelMetadata, ViewContext);
    ModelClientValidationRule stringLengthRule = validators
        .SelectMany(v => v.GetClientValidationRules())
        .FirstOrDefault(m => m.ValidationType == "length");
    if (stringLengthRule != null && stringLengthRule.ValidationParameters.ContainsKey("max"))
    {
        int maxLength = int.Parse(stringLengthRule.ValidationParameters["max"].ToString());
        string inputSize = "input-xxlarge";
        if (maxLength < 5)
        {
            inputSize = "input-mini";
        }
        else if (maxLength < 10)
        {
            inputSize = "input-small";
        }
        else if (maxLength < 30)
        {
            inputSize = "input-medium";
        }
        else if (maxLength < 75)
        {
            inputSize = "input-large";
        }
        else if (maxLength < 150)
        {
            inputSize = "input-xlarge";
        }
        Dictionary attributes = new Dictionary {
            { "class", inputSize },
            { "maxlength", maxLength.ToString(CultureInfo.InvariantCulture) }
        };
        @Html.TextBox("", Model, attributes)
    }
    else
    {
        Dictionary attributes = new Dictionary {
            { "class", "input-medium" }
        };
        @Html.TextBox("", Model, attributes)
    }
}
Tuesday, September 3, 2013
How to expose internal methods to a different assembly
Let's say you create this method - let's call it MethodX. Now MethodX is only used within the project - so you marked it as "internal". So now you want to test this MethodX.
Now, I know that in theory MethodX is used internally in the project, which exposing public members of public classes etc - and those public classes and their members are the ones ought to be tested. Using MethodX or not is an implementation detail that the consumer does not need to know, hence does not need to be tested specifically. Yupe, agreed - that is all good.
Now, let's set that aside for a moment - and if you want to test the internal MethodX directly, how would you do it? Of course, the easiest solution is by making MethodX (and the class containing it) to be public. But, then you must remember to convert it back (and forth) every time you run your tests - which is quickly becoming a pain.
It turns out, there is a flag/attribute that you can set in your class declaration to specifically mark a class and its internals to be visible to a different set of assembly. Take a look at this example below:
-- read more and comment ...
It turns out, there is a flag/attribute that you can set in your class declaration to specifically mark a class and its internals to be visible to a different set of assembly. Take a look at this example below:
[assembly:InternalsVisibleTo("MyProject.Tests")]
namespace MyProject
{
    public class MyClass
    {
        internal void MethodX()
        {
            // ...
        }
    }
}
So normally, although the class MyClass is public and is available to public, but the method MethodX is not accessible from outside the same assembly. But, upon putting the InternalsVisibleToAttribute, now MethodX is accessible from MyProject.Tests assembly. If this consuming assembly is your test project, then you can start to build a test for it just like testing against a public method.
Topics:
C#,
Visual Studio
Saturday, August 24, 2013
How to create a unit test that expect an exception?
In creating unit tests, we want to get maximum code coverage to make sure we are testing all possible scenarios and outcomes of our code. When we have a possible path of execution that leads into an exception being thrown, how do we build a test for that?
Consider this simple method "GoToPage" that takes in an integer as a parameter in the "Book" class.
-- read more and comment ...
public class Book
{
    // ...

    public void GoToPage(int page)
    {
        if (page < 1)
            throw new ArgumentException("Page must be a positive, non-zero integer", "page");
        if (page > TotalPage)
            throw new ArgumentException("Page cannot be more than the total page count", "page");

        // ...
    }

    // ...
}
So how do we test those boundary scenarios? We can do something like this:
[TestMethod]
public void NegativePage_Exception()
{
    // arrange
    var book = new Book();

    // act
    try
    {
        // act
        book.GoToPage(-1);
    }
    catch (ArgumentException e)
    {
        // assert
        Assert.AreEqual("Page must be a positive, non-zero integer", e.Message);
    }
    catch (Exception) {
        Assert.Fail();
    }
}
Or, you can write a more concise test such as this:
[TestMethod]
[ExpectedException(typeof(ArgumentException), "Page must be a positive, non-zero integer")]
public void NegativePage_Exception()
{
    // arrange
    var book = new Book();

    // act
    book.GoToPage(-1);
}
Thursday, August 22, 2013
Creating data validation unit test
Creating a unit test is pretty simple for a method, but when your business/POCO objects are relying on DataAnnotation for validation, how do you make sure that they are implemented and tested? Obviously, one can create all the classes run the test from the UI and check whether one can enter invalid data. Is there another way of doing this instead of waiting to test them from the UI? If we are doing TDD, can we build the test first?
For example, let's say we have this class "Person", which requires that both first name and last name to be required, but middle name is optional.
-- read more and comment ...
public class Person
{
    [Required]
    public string FirstName { get; set; }

    public string MiddleName { get; set; }

    [Required]
    public string LastName { get; set; }
}
There are several ways to create tests for this class - the first one is to check whether the property is decorated with the RequiredAttribute.
[TestMethod]
public void Person_FirstName_IsRequired()
{
    // arrange
    var propertyInfo = typeof(Person).GetProperty("FirstName");

    // act
    var attribute = propertyInfo.GetCustomAttributes(typeof(RequiredAttribute)).Cast().FirstOrDefault();

    // assert
    Assert.IsNotNull(attribute);
}
Or another way is by testing the validation itself.
[TestMethod]
public void Person_FirstName_IsRequired()
{
    // arrange
    var person = new Person();
    var context = new ValidationContext(person, null, null);
    var validationResults = new List();

    // act
    var isValid = Validator.TryValidateObject(person, context, validationResults);

    // assert
    Assert.IsTrue(validationResults.Any(e => e.ErrorMessage == "The FirstName field is required"));
}
Topics:
C#,
unit test,
validation
Wednesday, April 10, 2013
Handling 404 Error in ASP.NET MVC
In ASP.NET Web Forms, handling 404 errors are easy - which is basically a web.config setting. In ASP.NET MVC, it is a bit more complicated. Why is it more complicated? In comparison, everything is seemingly easier in MVC than WebForm.
It is more complicated mainly because of Routing. In WebForm, most 404 occurs because of non-existent file and each UR: is usually mapped to a particular file (aspx). With MVC, that is not the case. All requests are handled by the Routing table and based on that it will invoke appropriate controller and actions etc. Secondly, our basic default route usually is quite common ({controller}/{action}/{id}) - therefore most URL request will be caught by this route.
So, let's dive in on how can we do proper handling of 404 errors with ASP.NET MVC.
TURN ON CUSTOM ERROR IN WEB.CONFIG
    <customErrors mode="On" defaultRedirect="~/Error/Error">
      <error statusCode="404" redirect="~/Error/Http404" />
    </customErrors>
DECLARE DETAIL ROUTES MAPPED IN ROUTE TABLE
So instead of just using the default route:
   routes.MapRoute(
      name: "Default",
      url: "{controller}/{action}/{id}",
      defaults: new { controller = "Home", action = "Index", id = UrlParameter.Optional }
   );
Declare all your intended route explicitly and create a "catch-all" to handle non-matching route - which basically a 404. In MVC, a 404 can happen when you try to access a URL where the there is no controller for. This code in the routing table handles that scenario.
   routes.MapRoute(
      name: "Account",
      url: "Account/{action}/{id}",
      defaults: new { controller = "Account", action = "Index", id = UrlParameter.Optional }
   );

   routes.MapRoute(
      name: "Home",
      url: "Home/{action}/{id}",
      defaults: new { controller = "Home", action = "Index", id = UrlParameter.Optional }
   );

   routes.MapRoute(
      name: "Admin",
      url: "Admin/{action}/{id}",
      defaults: new { controller = "Admin", action = "Index", id = UrlParameter.Optional }
   );

   routes.MapRoute(
      name: "404-PageNotFound",
      url: "{*url}",
      defaults: new { controller = "Home", action = "Http404" }
   );
OVERRIDE HANDLEUNKNOWNACTION IN BASECONTROLLER CLASS
Create a Controller base class that every controller in your application inherits from. In that base controller class, override HandleUnknownAction method. Now, another scenario that a 404 may happen is that when the controller exists, but there is no action for it. In this case, the routing table will not be able to trap it easily - but the controller class has a method that handle that.
    [AllowAnonymous]
    public class ErrorController : Controller
    {
        protected override void HandleUnknownAction(string actionName)
        {
            if (this.GetType() != typeof(ErrorController))
            {
                var errorRoute = new RouteData();
                errorRoute.Values.Add("controller", "Error");
                errorRoute.Values.Add("action", "Http404");
                errorRoute.Values.Add("url", HttpContext.Request.Url.OriginalString);

                View("Http404").ExecuteResult(this.ControllerContext);
            }
        }

        public ActionResult Http404()
        {
            return View();
        }

        public ActionResult Error()
        {
            return View();
        }
    }
CREATE CORRESPONDING VIEWS
View for generic error: Error.chtml
@model System.Web.Mvc.HandleErrorInfo

@{
    ViewBag.Title = "Error";
}

<hgroup class="title">
    <h1 class="error">Error.</h1>
    <br />
    <h2 class="error">An error occurred while processing your request.</h2>
    @if (Request.IsLocal)
    {
        <p>
            @Model.Exception.StackTrace
        </p>
    }
    else
    {
        <h3>@Model.Exception.Message</h3>
    }
</hgroup>
View for 404 error: Http404.chtml
@model System.Web.Mvc.HandleErrorInfo

@{
    ViewBag.Title = "404 Error: Page Not Found";
}
<hgroup class="title">
    <h1 class="error">We Couldn't Find Your Page! (404 Error)</h1><br />
    <h2 class="error">Unfortunately, the page you've requested cannot be displayed. </h2><br />
    <h2>It appears that you've lost your way either through an outdated link <br />or a typo on the page you were trying to reach.</h2>
</hgroup>
Sunday, April 7, 2013
Properly Deleting Database for Database-Migration
I am working on a simple brand new project with ASP.NET MVC and decided to try EF to connect to my database. This gives me the opportunity to learn EF Code-First, database-migration, etc.
Everything seems to be pretty intuitive until when I am running "update-database" from the Package Manager Console. I created my Configuration class, turn-on automatic migration, and populated my database using Seed method, made sure all my context are correct.
[TL;DR]
When one need to delete/recreate a database, do not delete the mdf file from App_Data, but instead go to "SQL Server Object Explorer" and find your database under (localdb) and delete it from there.FULL VERSION:

Then, since I want to recreate my database, I delete my database (mdf file) from my App_Data folder under Solution Explorer and then run "update-database". See picture on the left.
But then I am getting an error:
Cannot attach the file D:\Projects\MvcApplication1\App_Data\aspnet-MvcApplication1-20130407085115.mdf' as database 'MvcApplication1'.I looked in the file explorer and the mdf file is surely gone. Try to close Visual Studio and reopen, same error.
Well, the database was initially created when I try to "Register" or create an account using the site (it's using SimpleMembershipProvider) - so maybe it will recreate it if I simply run the site and try to register again. But then I am getting the same error when running the website.
I went to the recycle bin, restore the mdf file and ran the project again - it worked. It did not have the new tables or new data, but no "cannot attach" error. Restoring this file also restore my default connection. If I try to delete the mdf file again, then my project won't run and my database-migration also won't run.
I almost resort to think that "Code-First" is a lie - that I simply have to add the new tables manually in the SQL table designer, etc. This is so confusing - should not be that hard, I think.
So maybe I need to delete the data connection instead of deleting the mdf file from App_Data? So I did a restore again from my Recycle Bin, made sure my project ran, and then I deleted my connection from the Server Explorer, rebuilt the project and ran it. It worked! But my delight is short-lived, since then I realized that deleting the connection does not necessarily mean deleting the database - which I quickly checked that my mdf file still in the App_Data folder. I simply deleted the connection to view the database via Visual Studio.
I tried more and more things - which increase the frustration level - because at this point I am stuck in my project and all I have been trying to do is to modify my database schema. If I did this using the old way using SQL Management Studio or SQL Express, or even Linq-to-SQL, I could have been making a huge progress in my project.
SOLUTION

Out of curiosity, I deleted my database from there and re-ran my project - it worked. It recreated my database (without the new tables and seed data). So I deleted it again from SQL Object Explorer, and ran "update-database" - it ran successfully this time. EUREKA!!
So lesson learned: when one need to delete/recreate a database, do not delete the mdf file from App_Data, but instead go to "SQL Server Object Explorer" and find your database under (localdb) and delete it from there.
Subscribe to:
Posts (Atom)

